Felicity Blanket (Free and Easy Knitting Pattern)
The inspiration for this center out knit blanket pattern came from my desire to make easy but modern designs. I very much enjoy using only basic stitches to create designs that really stand out and can become timeless classics.
I’ve come to the conclusion recently that I love knitting blankets. This is actually the third free knit blanket pattern I’ve released this year! Scroll just a little further for links to my other simple knit blanket patterns.
The free version of this pattern is available below or click HERE to purchase a downloadable, ad-free PDF version of this pattern.
Looking for crochet blanket patterns?
Click here to see all of my crochet patterns organized by type of project.
About the Yarn
As soon as I saw this Lion Brand Yarn Mandala Ombre color in Felicity at my local JoAnn, I knew I needed it. Sometimes yarn just speaks to you, right?
I knew I wanted to make a cozy blanket with it, but it sat in my stash for months before I decided on a design. I actually made this blanket design with double strands of bulky weight yarn first (with a different border that I decided I didn’t love) and decided I wanted to recreate it with a yarn with more stitch definition.
I decided to use double strands of this worsted weight yarn to create a strand equivalent to bulky yarn for a couple reasons. First, it would work up faster. Second, I wanted to see how these variegated yarns would look doubled together.
I intentionally tried to start the first two cakes of yarn so that the same colors wouldn’t overlap but they did anyway. I didn’t love that at first but after working more and more of it I fell in love with the randomness of the coloring.
You can use double strands of worsted weight acrylic yarn like I did, or you can use absolutely any yarn you’d like. I’ve written this pattern to be worked with any weight of yarn and to any size.
I used six skeins of Lion Brand Mandala Ombre and had only a few grams of yarn left (not much yarn at all!) after the bind off. Be sure you purchase enough yarn for your entire desired finished size. If you’ve never used mandala yarn before, the first time stitching it up and watching the different colors come to life is really amazing.
Some other different types of yarn I would love to make this center out knit blanket pattern in are:
- Red Heart Soft – This is a soft and versatile worsted weight yarn great for making blankets. Use it single stranded for a thinner blanket or use double or even triple strands of yarn for a thicker, cozier blanket.
- Lion Brand Pound of Love – This is another versatile worsted weight yarn and there are so many color options. One skein of this yarn can be enough for your entire project.
- Bernat Pipsqueak – This is a fluffy bulky weight yarn that is super soft and makes amazing blankets. It can be hard to see your stitches with this textured yarn, so I think knitting with it is much easier than crocheting with it.
- Lion Brand Hue + Me – This blanket pattern would look great in any of the solid colors available or a combination of any and all of the colors. Did you know that this line of yarn was designed to be able to mix and match any of the colors to make a gorgeous color palette?
- Lion Brand Wool Ease Thick & Quick – Any variety of this line of yarn would be an amazing choice and would make a cozy chunky wool blanket. I would love to make a blanket in one of the variegated colorways like Carousel.
Techniques Used
This free center out knit blanket pattern is designed to be beginner friendly using only basic knitting stitches.
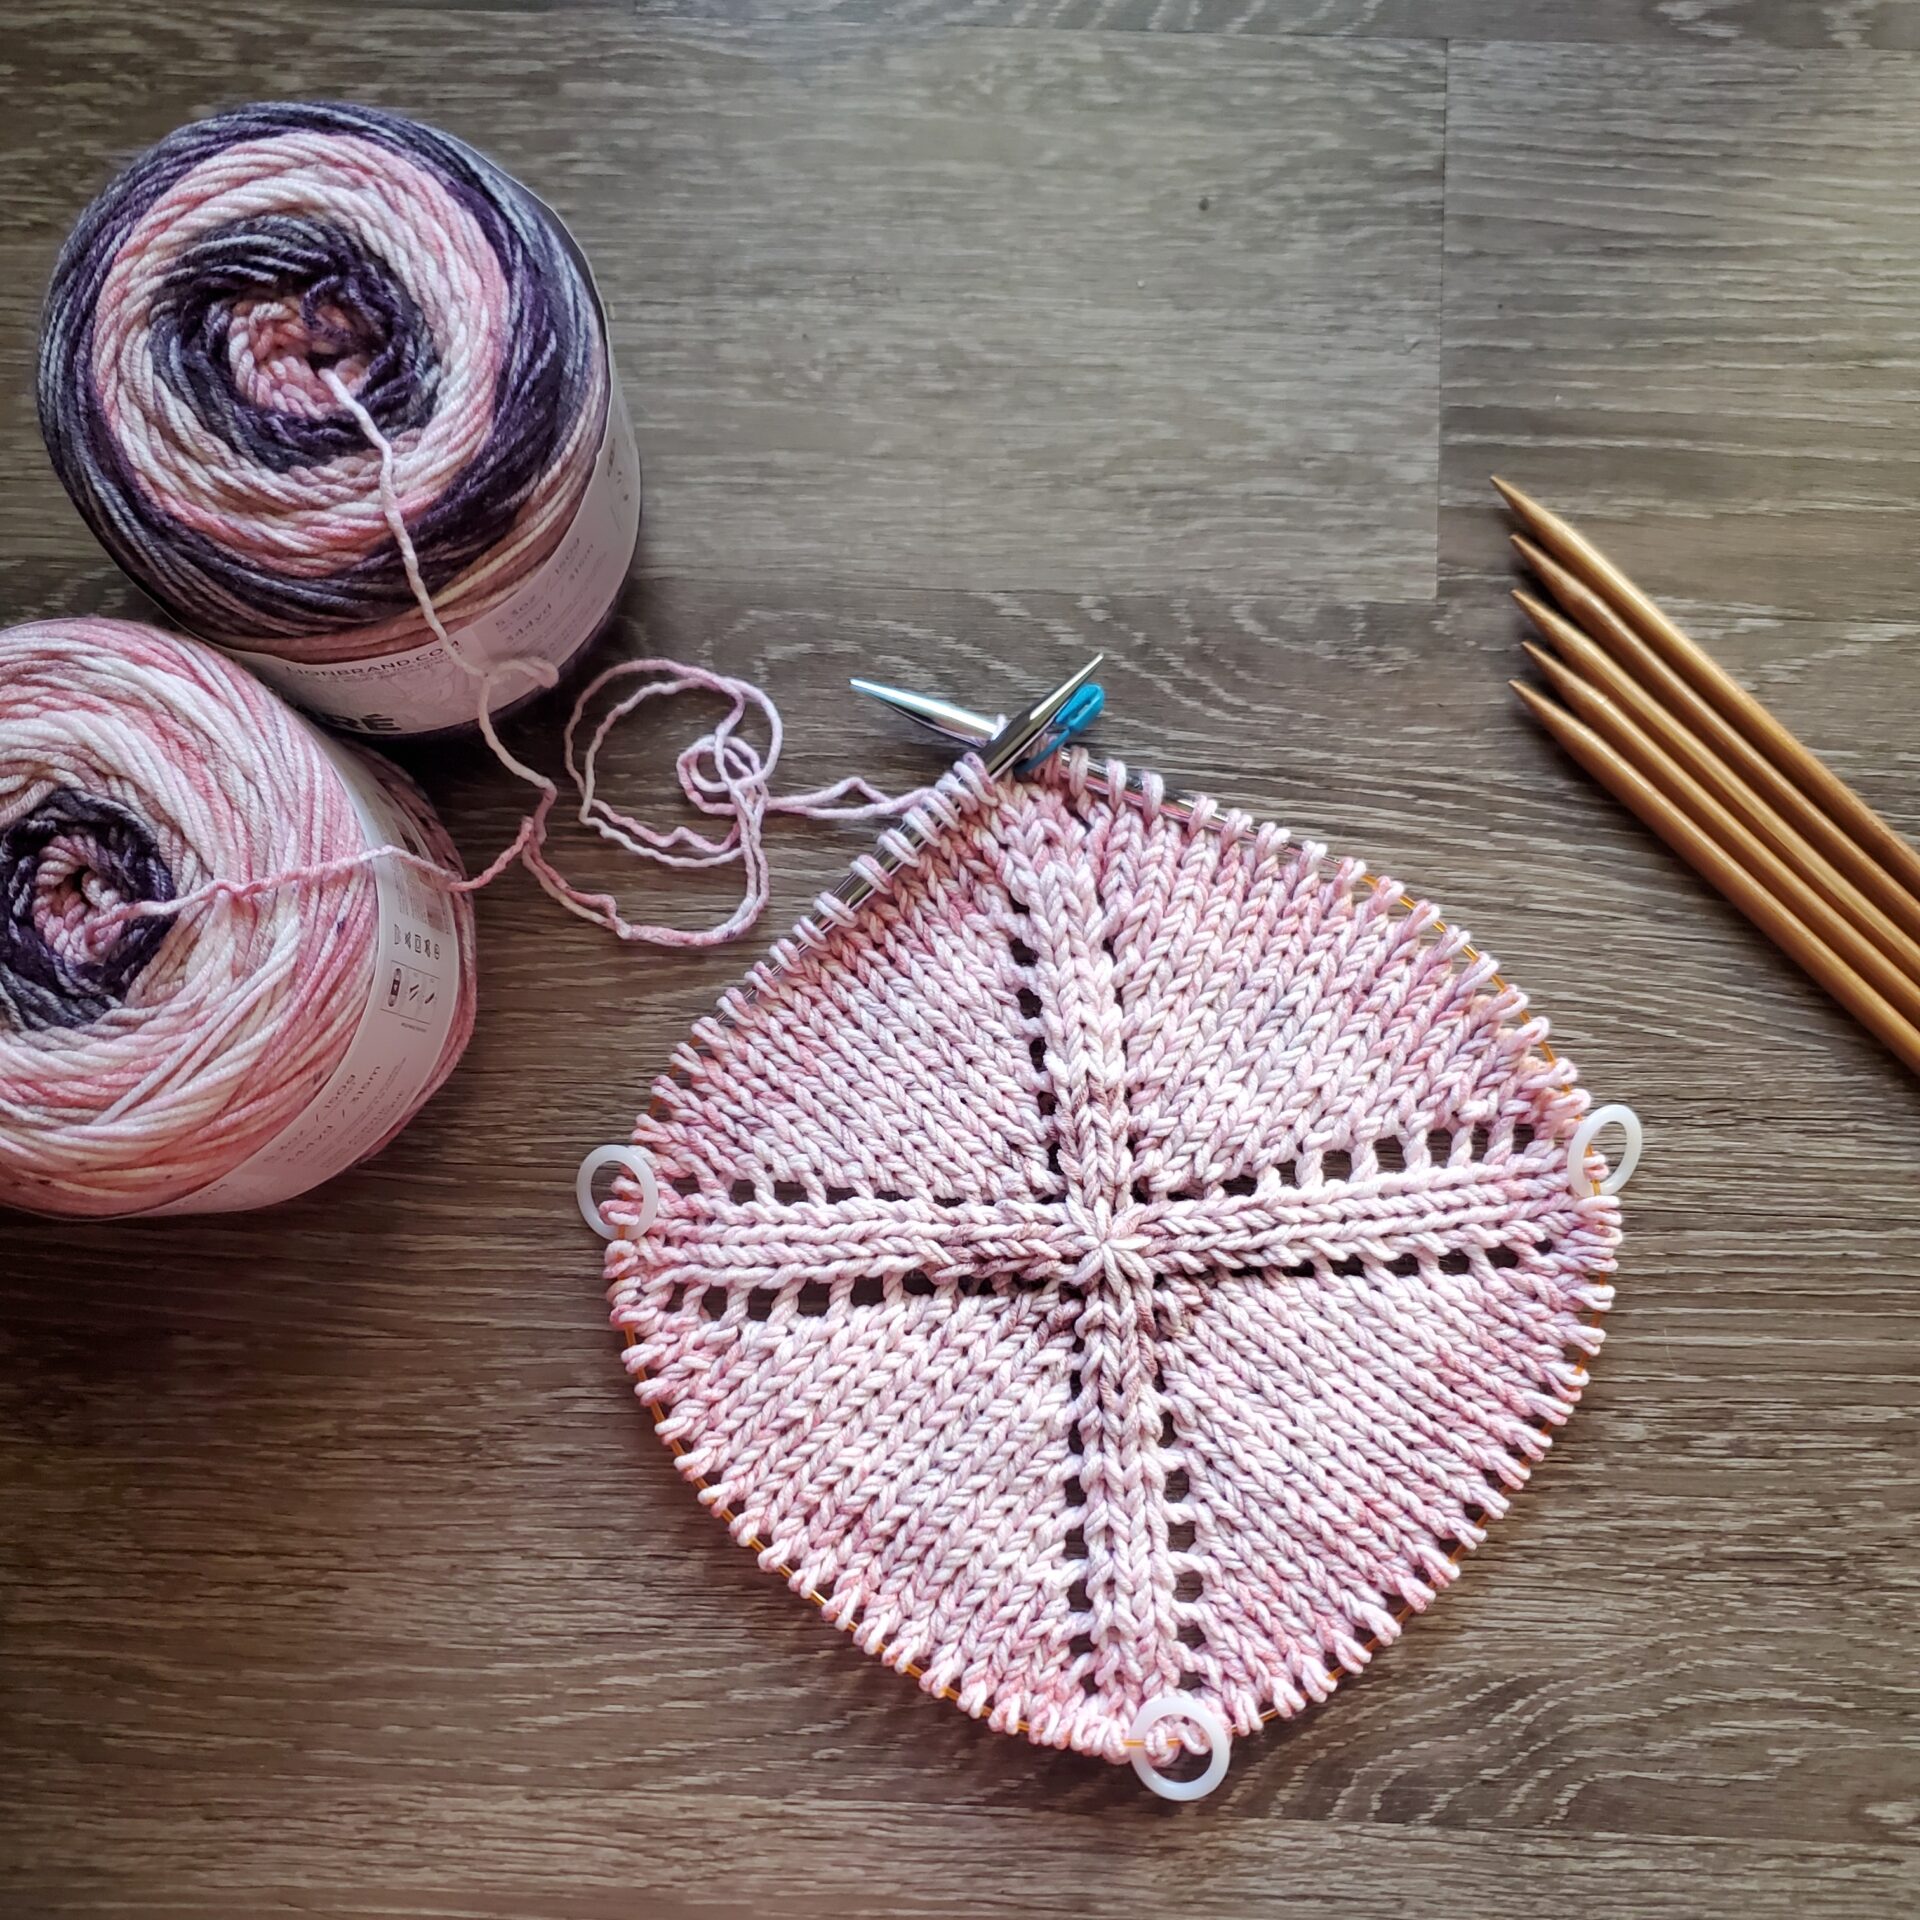
The beginning or center of the blanket is started using the pinhole cast on method. This method is not easy in and of itself but creates the perfect cast on for center out projects in my opinion. After I created my Blair Bag using this cast on technique, I knew I wanted to try my hand at making a blanket starting the same way. In my opinion, the best way to create this cast on is with double-pointed needles.
Check out the video tutorial below for a slow-motion tutorial on how to create this cast on. This is the hardest part of the blanket and if you can get past it, you’re golden!
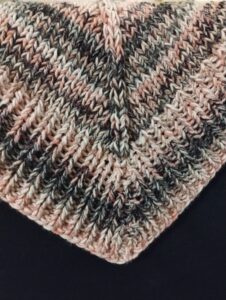
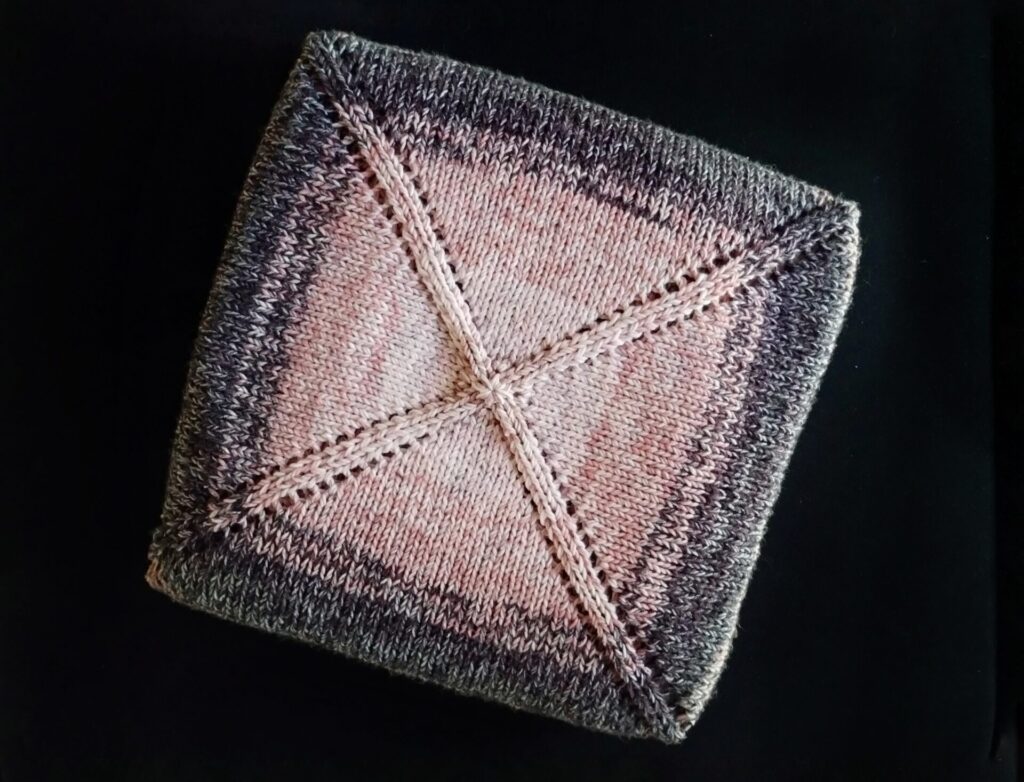
The body of the blanket is very easy using only knit stitches in the round and easy yarn over increases at the corners. The yarn overs at the corners are what create the pretty lacy look and you’ll use stitch markers to mark where the increases are. I personally love the feminine touch it adds.
The border is a 1×1 ribbing. You’ll continue increasing at the corners, but the increases will switch from yarn overs to k1p1 and p1k1 (see Stitch Index below). I wanted the border to be solid with no toe holes.
The type of bind off you use is completely up to you. I used a traditional bind off, in pattern, and loosely to be sure it laid flat.
The Journey
Knitting this blanket was a whole journey. I started it in March of this year (posting it here in October!). I was super motivated until it got to a certain size, then I put it down for a few months. Then I picked it back up and was super motivated again until I got up to about 350 stitches per round.
I pick it back up again a month or two later and FINALLY, it was time to start on the border! The border and bind off even took me a few days because I thought I might be playing yarn chicken at the end of it. Luckily, I had just enough yarn with a few grams to spare.
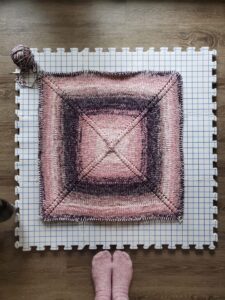
Here’s a photo of the bebe blanket right after switching to circulars.

This photo is the last time I saw it laid out flat until the bind off. Yes, I could have used another set of needles or scrap yarn to lay it out, but I didn’t feel like messing with all that. Just keep on trucking!
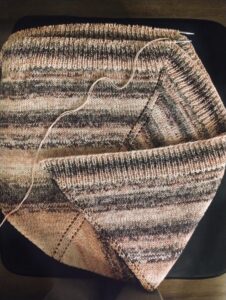
Nine months later, I’m finally ready for the bind off! My stitches were so crowded but when I added an extra bit of cord to it previously, it was more difficult to move the stitches around than I cared to mess with, so I removed it.

Halfway there! And I put it down for a couple days for fear of running out of yarn.
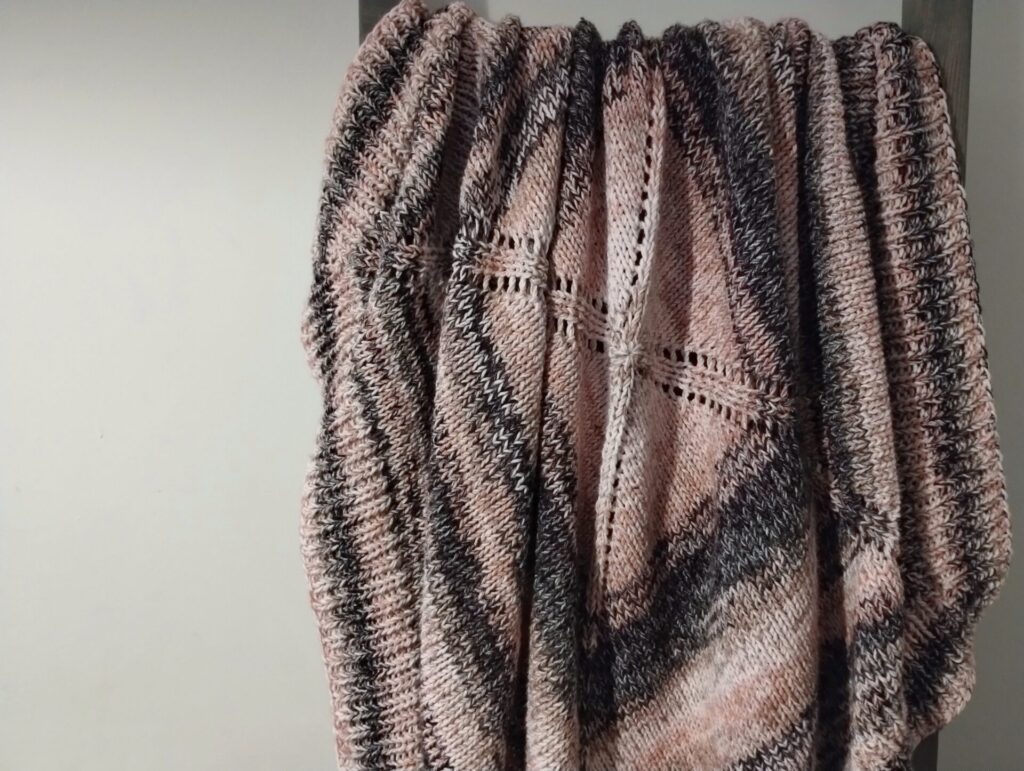
And here she is in all her glory. I absolutely love how she came out!
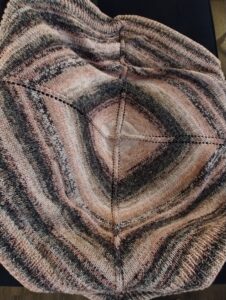
And here’s a close up of the border.
More Free Blanket Knitting Patterns
- Teddy Bear Blanket – A beginner friendly chunky blanket pattern using only knit and purl stitches. This one is a quick knit that creates a beautifully textured fabric.
- Mr. Yarnique’s Chunky Knit Blanket – A chunky knit blanket pattern with a fun and easy stitch pattern. This is a large blanket that used 16 skeins of yarn (super bulky weight) and is perfect for adults.
Skill Level
Easy
Gauge
Gauge is not important for this project as it’s written to be worked with any weight of yarn. I’ve included mine for reference.
12 sts and 17 rows of stockinette stitch in the round and after blocking is 4″ x 4″ (10x10cm)
Finished Measurements
50” (127cm) square, after blocking
Note: Pattern is written to be worked with any weight of yarn and to any desired size. Your finished blanket will be square shaped and the same measurement on each side.
Materials
6 skeins Lion Brand Mandala Ombre in Felicity (held doubled)
OR
Your choice of any weight of yarn (see Notes section)
US Size 11/UK Size 0/8mm needles (DPNs and circular needles large enough for the size of your project, varying by desired size)
Stitch markers (4 total, 1 different for BOR)
Tapestry needle for weaving in ends
Scissors
Measuring tape or gauge swatch measuring device
Blocking mats and pins (optional but highly recommended)
Notes
– This center out knit blanket pattern is designed to be worked with any weight of yarn. Whichever yarn you use, use the recommended knitting needle size for that yarn.
– You will repeat the 2 rows of the body until you reach your desired width/length (minus how much width you want for the border).
– Pattern instructions are written per the sample in the photos.
– * * indicates a repeat
– [ ] indicate
– (xx) at the end of a row/round indicates how many total stitches for that row/round
Stitch Index
CO – cast on
R – row/round
BOR – beginning of row/round
PM – place marker
SM – slip marker
BO – bind off
YO – yarn over
k – knit
k1fb – knit 1 front and back (knit 1 through the front leg of the stitch, do not remove stitch from left needle, knit 1 through the back leg of the stitch, remove stitch from left needle [increase by 1 st])
p – purl
p1k1 – purl 1 front, knit 1 back (purl 1 in the front leg of the stitch, do not remove stitch from left needle, knit 1 through the back leg of the stitch, remove stitch from left needle [increase by 1 st])

Click here to purchase a downloadable, ad-free PDF version of this pattern.
Pattern
Foundation Using DPNs and the pinhole method, CO 8 (if you prefer to use the magic circle method, you’ll need to PM for BOR and PM every 2 sts and SM here and throughout)
R1 k each st around (8)
R2 *k1, yo, k1* 4 times (12)
R3 k each st around (12)
R4 *k1, yo, k1, yo, k1* 4 times (20)
R5 k each st around (20)
R6 *k1, yo, k3, yo, k1* 4 times (28)
R7 k each st around (28)
R8 *k1, yo, k5, yo, k1* 4 times (36)
R9 k each st around (36)
R10 *k1, yo, k to 1 st before marker, yo, k1* 4 times (inc by 8 sts each inc R)
R11 k each st around (same st count as previous R)
Repeat R10-11 until you reach your desired width/length minus the border. I had 105 sts on each side (420 sts total) when I started the border. Switch to a longer cord as needed to hold all your sts as it grows.
Border (row count will start back at 1 for easy counting)
R1 [k1fb, *k1, p1* until 1 st before marker, p1k1, SM] 4 times (428)
R2 [k1, *p1, k1* to marker, SM] 4 times (428)
R3 [p1k1, *p1, k1* until 1 st before marker, k1fb, SM] 4 times (436)
R4 [p1, *k1, p1* to marker, SM] 4 times (436)
Repeat R1-4, ending on R2 for 3.5” (8cm) or until you reach your desired border width.
Bind off in pattern using your preferred bind off method.
Finish off and weave in ends!
Blocking is optional but I highly recommend it to open up the corners and really show off the details.
Looking for more knitting patterns?
Click here to see all of my free knitting patterns!
Final Thoughts on the Felicity Blanket
I hope you love this center out knit blanket pattern and decide to make your own. Which yarn will you use? Let me know in the comments below!
Sharing is caring and a great way to support small businesses like mine at no additional cost! Bookmark this blog post or pin it to your favorite Pinterest board for later and to share with your friends.
Happy knitting!
Bloggers: I would love for you to feature my work in a roundup! You may use one photo and link directly to my blog for the free pattern. Send me an email at yarniqueblog@gmail.com with a link to your post so I can share it with my followers.