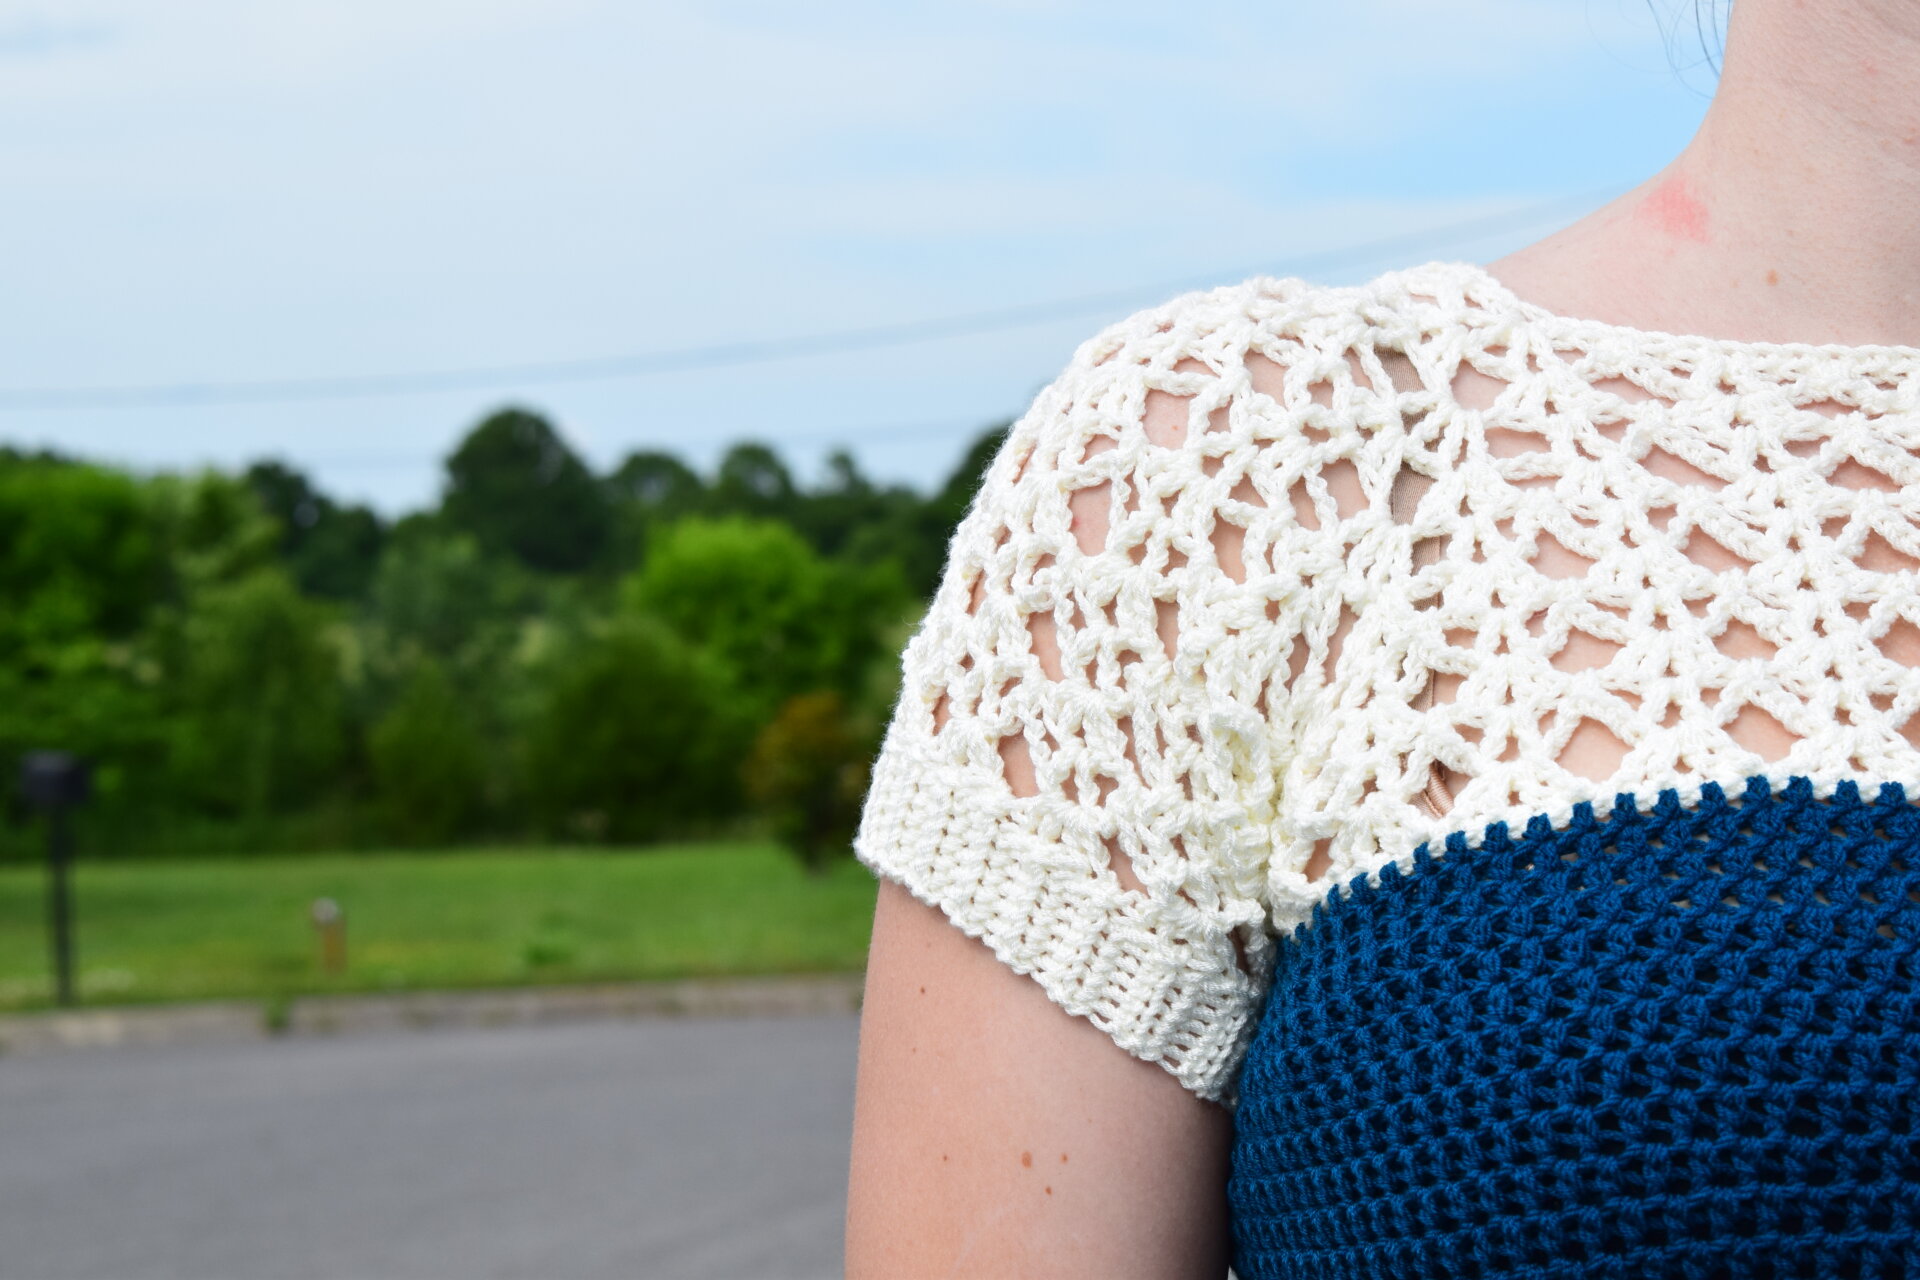
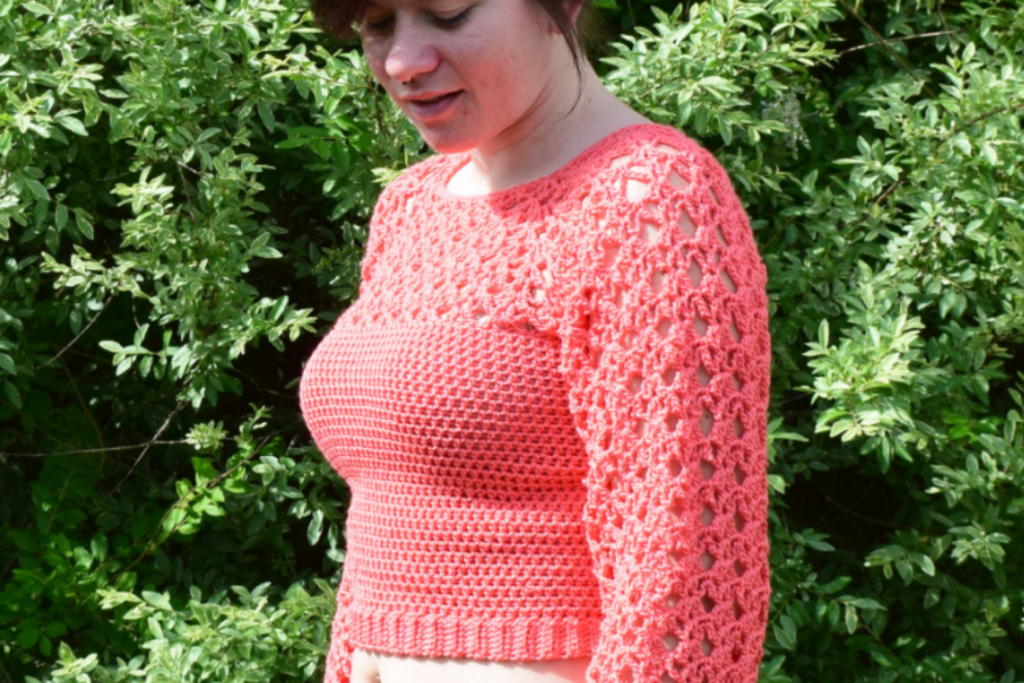
Coralyn Raglan (Free Crochet Pattern)
As always, this modern crochet pattern will remain free on the blog forever, with ads. Click here if you’d like to purchase an ad-free and easy to read PDF.
Peekaboo Sunhat Sweater Weather Raglan Paprika Pocket Scarf
Introduction
Have you ever had an idea that came to fruition in a way that was somehow better than what you had imagined in your head? Well, this piece is definitely one of those! Meet the Coralyn Raglan.
Inspiration
I had a vision for months of a top with big lacy sleeves and a fitted body. I thought and thought and thought about how I would construct it and what stitch to use and then one day it just came to me. A few days later, Coralyn was born. I hope you love her and all of her customization possibilities as much as I do and I can’t wait to see all the different versions you all make of her!
About the Yarn
I made two different versions of Coralyn and used Lion Brand ZZ Twist for both of them. ZZ Twist is THE perfect worsted weight garment yarn in my opinion. It has the perfect amount of stretch and yields the most amazing drape. I highly recommend this yarn for this project. If you’re looking for an alternative, though, some other yarns I would recommend are:
Bernat Handicrafter DeLux Cotton
Techniques Used
I swear this lace pattern is easier than it looks! It consists completely of chains, single crochets, and double crochets. That’s it! I’ve included lots of photos and super detailed instructions to make it as easy as possible and if you purchase the inexpensive PDF copy there’s a stitch chart as well. The rest of the body is simply half double crochets so that part really flies! I’ve labeled this as an intermediate pattern simply because of the lacework. You’ll have so much fun working it up though!
Skill Level
Intermediate
Gauge
15 sts and 12 rows of hdc in the round with 5mm hook is 4″ x 4″ (10x10cm)
Finished Measurements
All sizes are based on the Craft Yarn Council size chart. This pattern has negative ease which means the finished measurements are smaller than your actual measurements and the piece stretches to fit you. If you’d like a looser fit (with no ease to positive ease) I recommend going up a size or two. If you are unsure of which size to make, please reference the Craft Yarn Council website’s standard sizing chart HERE.
Materials
750-1800 yards Lion Brand ZZ Twist (I cannot recommend this yarn enough! See above for some other yarn recommendations) Please note that there are so many options to customize this design that this is a very wide and general approximation. The smallest yardage is for an XS short sleeve crop and the largest is for a 3X long sleeve dress, as the pattern is written. I always recommend buying more yarn than you need.
US Size G/6/4mm crochet hook (I use these!)
US Size H/8/5mm crochet hook (I use these!)
7 stitch markers (one different for BOR, plus additional if you’d like to use them to keep track of counting your rounds) (I use these!)
Tapestry needle for weaving in ends (I use these!)
Scissors (These Fiskars are my fav!)
Notes
-Please note that all tutorial photos are size Medium
-Use invisible decreases throughout the pattern (yo if working a hdc stitch or larger, insert hook into the FLO of the first stitch to decrease, insert hook into the FLO of the second stitch to decrease, yo and pull through 2 loops, finish stitch as usual)
-Pattern is written as follows: XS (S, M, L, XL, 2X, 3X). Purchase an inexpensive and printable PDF copy for color-coded sizes for easier reading! Available here.
-I have separated the first several rows into sections (i.e. 1A, 1B, 1C, etc.) simply for easier reading and keeping track of which part of the row you’re currently working.
-(xx) at the end of a row/round indicates how many total stitches for that row/round
Stitch Index
R-row/round
BOR-beginning of row/round
inc-increase
dec-decrease
ch-chain
ch-sp-chain space
st(s)-stitch(es)
Slst2tog-slip stitch 2 stitches together (see notes about invisibly decreasing)
sk-skip
PM-place marker
BLO-work the stitch indicated in the back loop only of the stitch on the previous row
sl st-slip stitch
sc-single crochet
hdc-half double crochet
hdc2tog-half double crochet 2 stitches together (see notes about invisibly decreasing)
dc-double crochet
Special Stitches:
VST– V-stitch [dc, ch 1, dc] all in indicated stitch
DVST– Double V-stitch [2 dc, ch 1, 2 dc] all in indicated stitch

Pattern
(with 5mm hook)
Note: If you have a larger head, you may use fsc in place of the foundation row and first sc row to accommodate.
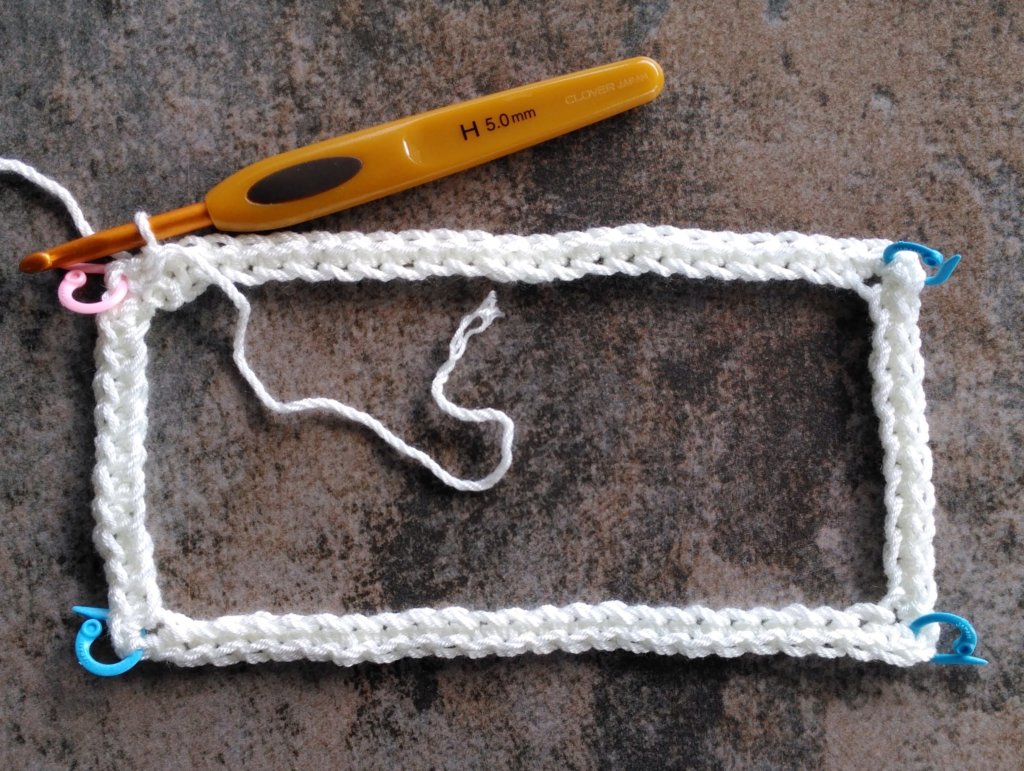
Foundation ch 68 (68, 68, 68, 92, 92, 92), being careful not to twist your ch, join with a sl st to the first ch, ch 1, do not turn
R1A working into the back bumps: [sc, ch 1, sc (place BOR marker in ch-sp)] all in the joining ch (first corner made), sc in the next 10 (10, 10, 10, 16, 16, 16) ch
R1B [sc, ch 1, sc (place marker in ch-sp)] all in the next ch (second corner made), sc in the next 22 (22, 22, 22, 28, 28, 28) ch
R1C [sc, ch 1, sc (place marker in ch-sp)] all in the next ch (third corner made), sc in the next 10 (10, 10, 10, 16, 16, 16) ch
R1D [sc, ch 1, sc (place marker in ch-sp)] all in the next ch (fourth corner made), sc in the next 22 (22, 22, 22, 28, 28, 28) ch, join with a sl st to the 1st sc, do not ch, do not turn
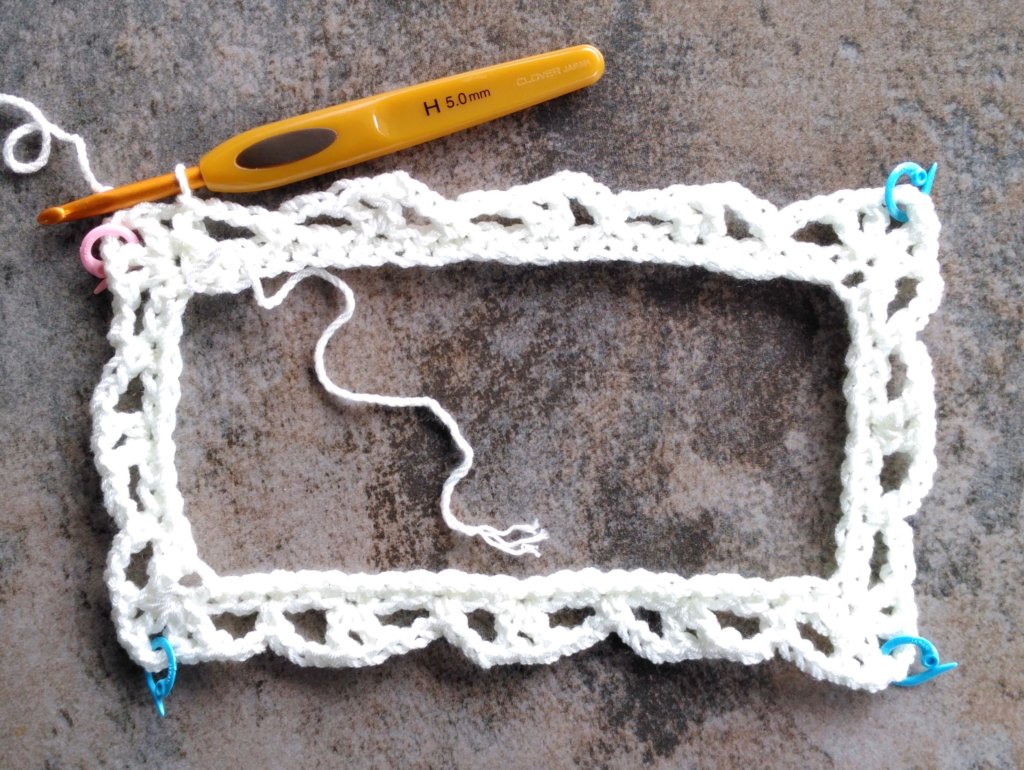
R2A sl st in the BLO of the next ch, sl st around the ch-sp, [ch 3 (counts as dc + ch 1), dc, ch 2 (PM marker), VST] all in the ch-sp (first corner complete)
R2B ch 3, sk 2 sc, sc in next sc, ch 3, sk 2 sc, *VST in next sc, ch 3, sk 2 sc, sc in next sc, ch 3, sk 2 sc*, [VST, ch 2 (PM), VST] in corner ch-sp (second corner complete)
R2C ch 3, sk 2 sc, sc in next sc, ch 3, sk 2 sc repeat from * to * to the next corner, [VST, ch 2 (PM), VST] in the corner ch-sp (third corner complete)
R2D repeat R2C (fourth corner complete)
R2E ch 3, sk 2 sc, sc in the next sc, ch 3, sk 2 sc, repeat from * to * to end, join with a sl st to the 2nd ch of the beginning ch 3, do not turn
Note: All DVSTs are worked into the VSTs from the 2nd row. All other ch-sps and scs are left unworked.
R3A [sl st, sc, ch 1 (counts as 1 dc), dc, ch 1, 2 dc] all in the first ch-sp, **ch 2 (PM), sk 1 ch-sp, DVST in the next ch-sp** (first corner complete)
R3B *ch 1, sk 2 ch-sp, DVST in the next ch-sp* repeat from * to * to the last ch-sp BEFORE your next corner marker, repeat from ** to ** once (second corner complete)
R3C-D repeat 3B (third and fourth corners made)
R3E repeat from * to * until 2 ch-sp remain, ch 1, join with a sl st to the top of the beginning dc
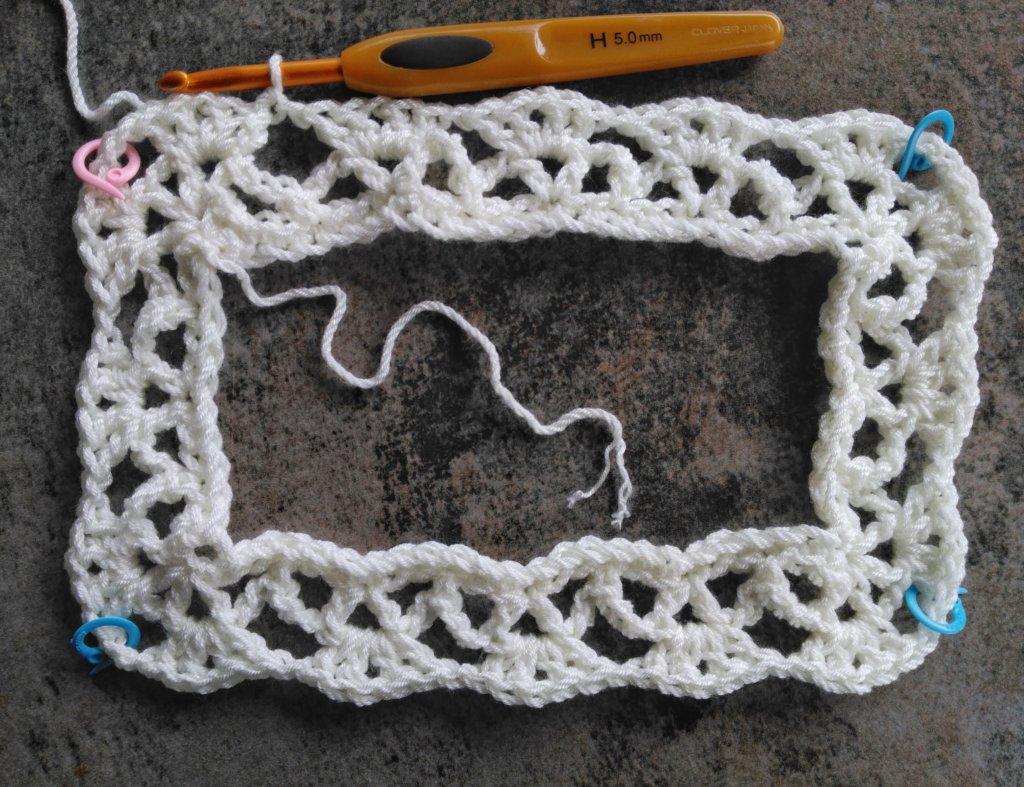
R4A sl st in the BLO of the next 5 sts, sl st around the ch-sp, [ch 3 (counts as dc + ch 1), dc, ch 2 (PM marker), VST] all in the ch-sp (first corner complete)
R4B ch 3, *VST in the next ch-sp, ch 3, sc in the next ch-sp (the ch 1 between the DVSTs), ch 3* repeat from * to * until one ch-sp remains BEFORE your next corner marker, VST in the next ch-sp, ch 3, [VST, ch 2 (PM), VST] all in the corner ch-sp (second corner complete)
R4C-D repeat R4B (third and fourth corners complete)
R4E ch 3, repeat from * to * until 1 ch-sp remains BEFORE your next corner marker, VST in the next ch-sp (over the sl sts made at the beg of the round, ch 3, join with a sl st in the 2nd ch of the beginning ch 3
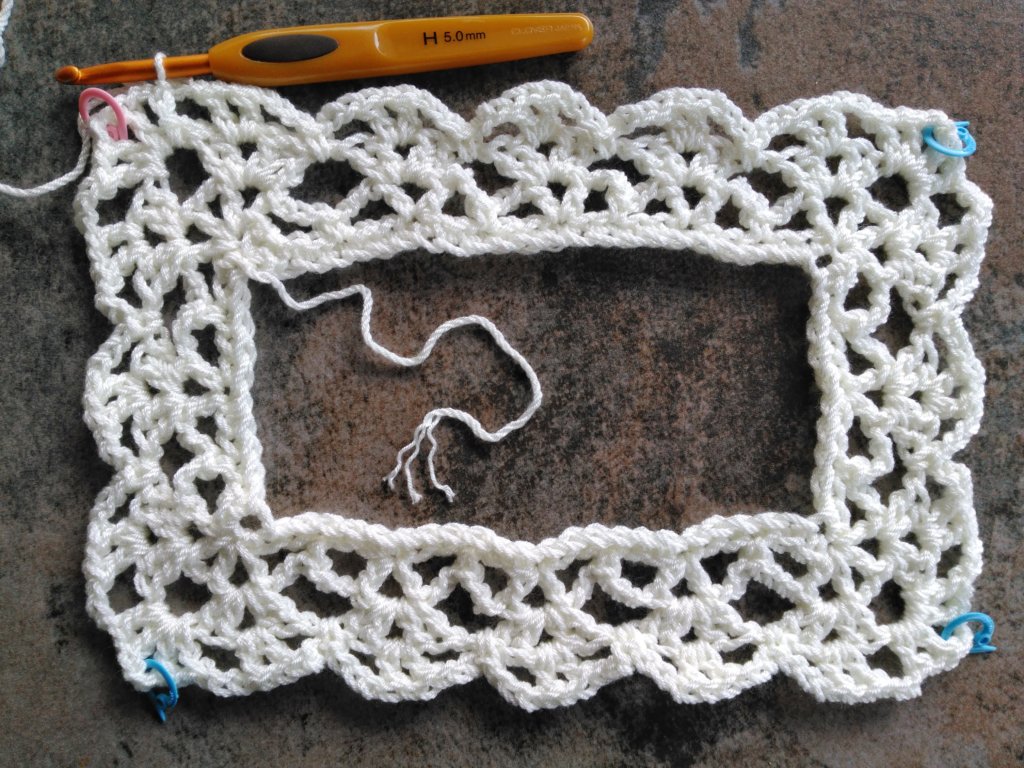
R5A sl st in the BLO of the next ch, sl st into/around the same ch-sp (in the middle of the VST), [sc, ch 1 (counts as 1 dc), dc, ch 1, 2 dc] all in the same ch-sp, ch 2 (PM), sk 1 ch-sp, DVST in the next ch-sp (the middle of the previous round’s VST) (first corner complete)
R5B ch 1, sk 1 ch-sp, DVST in the next ch-sp *ch 1, sk 2 ch-sp, DVST in the next ch-sp* repeat from * to * until 2 ch-sp remain BEFORE your next corner marker, ch 1, sk 1 ch-sp, DVST in the next ch-sp, ch 2 (PM), sk 1 ch-sp, DVST in the next ch-sp (second corner complete)
R5C-D repeat R5B (third and fourth corners complete)
R5E ch 1, sk 1 ch-sp, DVST in the next ch-sp *ch 1, sk 2 ch-sp, DVST in the next ch-sp* repeat from * to * until 1 ch-sp remains, ch 1, join with a sl st to the top of the beginning dc

R6-7 (9, 11, 11, 11, 13, 13) repeat R4-5 1 (2, 3, 3, 3, 4, 4) more time(s)
-Size Medium finished yoke-
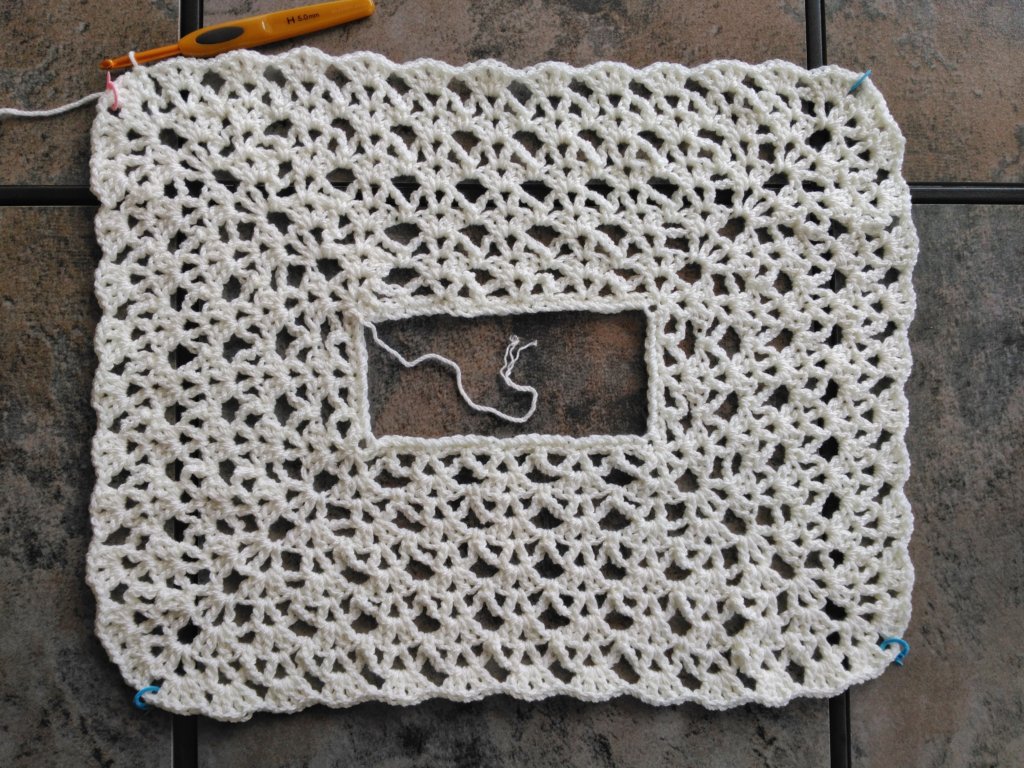
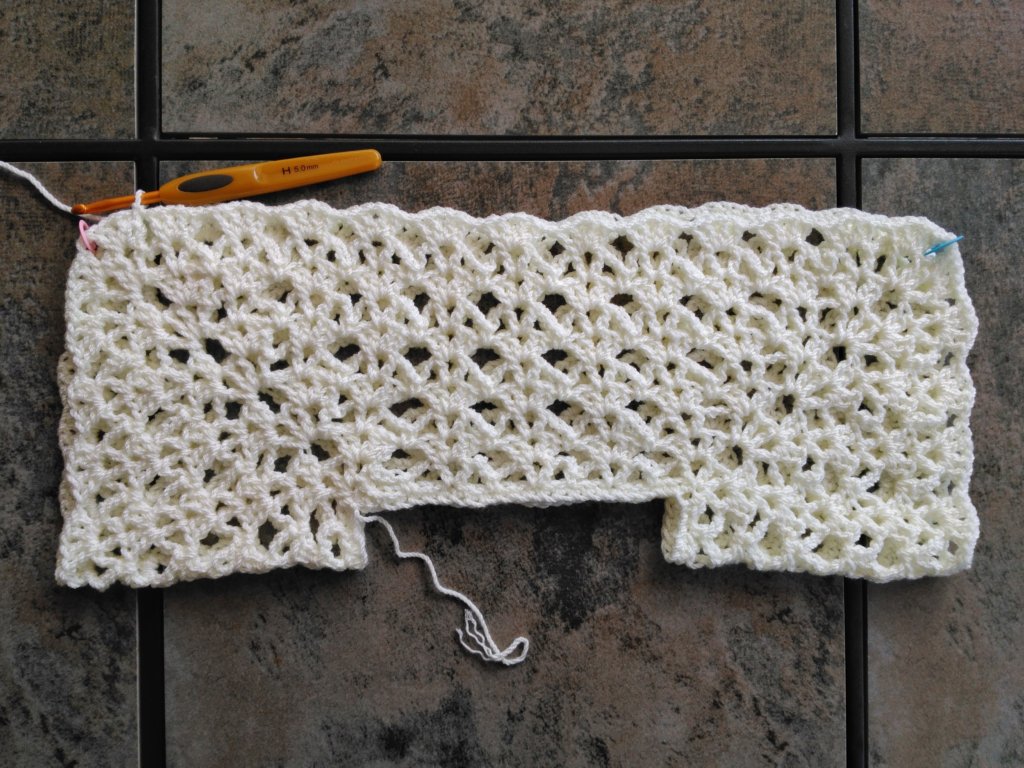
All Sizes: When splitting your yoke, you will fold your work in half hot dog length and skip all short side stitches to form the armholes as seen in the photo below.
Splitting your yoke (XS)
Part A do not ch, do not turn, (skipping the joining st) sc in the next 3 sts, place BOR marker in the first sc of the round, sk 1 dc, **2 sc in the next ch-sp (corner), ch 3, sk all sts to the next corner ch-sp, 2 sc in the corner ch-sp** (first armhole made)
Part B *sk 1 dc, sc in the next 3 sts (scing around the ch-sp), sk next dc, sc in the ch-sp between the DVST* repeat from * to * until 1 DVST remains BEFORE the next corner marker, sk 1 dc, sc in the next 3 sts (scing around the ch-sp), sk 1 dc, repeat from ** to ** once (second armhole made), repeat from * to * to the end of the round, proceed for instructions on whether to join or not (84)
Splitting your yoke (S)
Part A ch 1, do not turn, sc in the same joining st and the next dc, sk 1 ch-sp, sc in the next 2 dc, **2 sc in the next ch-sp (corner), ch 1, sk all sts to the next corner ch-sp, 2 sc in the corner ch-sp** (first armhole made)
Part B sc in the next 2 dc, *sk 1 ch-sp, sc in the next 2 dc* repeat from * to * to the next corner ch-sp, repeat from ** to ** once (second armhold made), sc in the next 2 dc, repeat from * to * to the end of the row, sk the last ch-sp, proceed for instructions on whether to join or not (98)
Splitting your yoke (M)
Part A do not ch, do not turn, sc in the next 3 sts, place BOR marker in the first sc of the round, sk 1 dc, **2 sc in the next ch-sp (corner), ch 1, sk all sts to the next corner ch-sp, 2 sc in the corner ch-sp** (first armhole made)
Part B *sk 1 dc, sc in the next 3 sts (scing around the ch-sp), sk next dc, sc in the ch-sp between the DVST* repeat from * to * until 1 DVST remains BEFORE the next corner marker, sk 1 dc, sc in the next 3 sts (scing around the ch-sp), sk 1 dc, repeat from ** to ** once (second armhole made), repeat from * to * to the end of the round, proceed for instructions on whether to join or not (112)
Splitting your yoke (L)
Part A ch 1, do not turn, sc in the same joining st and the next 4 sts (scing around the ch-sp here and throughout the row), **sc in the next ch-sp (corner), ch 1, sk all sts to the next corner ch-sp, sc in the corner ch-sp** (first armhole made)
Part B sc in the next 5 sts, sk 1 ch-sp, *sc in the next 2 dc, sk 1 ch-sp, sc in the next 2 dc, sk 1 ch-sp, sc in the next 5 sts, sk 1 ch-sp* repeat from * to * to the next corner omitting the very last sk of the repeat, repeat from ** to ** once, sc in the next 5 sts, sk 1 ch-sp, repeat from * to * to the end of the round, you’ll finish the round in the middle of a repeat, proceed for instructions on whether to join or not (124)
Splitting your yoke (XL)
Part A ch 1, do not turn, sc in the same joining st and the next dc, sk 1 ch-sp, sc in the next 2 dc, **2 sc in the next ch-sp (corner), ch 1, sk all sts to the next corner ch-sp, 2 sc in the corner ch-sp** (first armhole made)
Part B *sc in the next 5 sts (sc-ing into/around the ch-sp here and throughout), sk 1 ch-sp, sc in the next 2 dc, sk 1 ch-sp, sc in the next 2 dc* repeat from * to * to the next corner ch-sp, repeat from ** to ** once (second armhold made), repeat from * to * to the end of the row, you will end in the middle of a repeat, sk the last ch-sp, proceed for instructions on whether to join or not (136)
Splitting your yoke (2X)
Part A ch 1, do not turn, sc in the same joining st and the next dc, sk 1 ch-sp, sc in the next 2 dc, **sc in the next ch-sp (corner), sk all sts to the next corner ch-sp, sc in the corner ch-sp** (first armhole made)
Part B *sc in the next 5 sts, sk 1 ch-sp, sc in the next 2 dc, sk 1 ch-sp, sc in the next 2 dc, sk 1 ch-sp* repeat from * to * to the next corner omitting the very last sk of the repeat, repeat from ** to ** once, repeat from * to * to the end of the round, you will end the round in the middle of a repeat, proceed for instructions on whether to join or not (148)
Splitting your yoke (3X)
Part A ch 1, do not turn, sc in the same joining st and the next 4 sts (scing around the ch-sp here and throughout the row), **2 sc in the next ch-sp (corner), ch 1, sk all sts to the next corner ch-sp, 2 sc in the corner ch-sp** (first armhole made)
Part B sc in the next 5 sts, sk 1 ch-sp, *sc in the next 2 dc, sk 1 ch-sp, sc in the next 2 dc, sk 1 ch-sp, sc in the next 5 sts, sk 1 ch-sp* repeat from * to * to the next corner omitting the very last sk of the repeat, repeat from ** to ** once, sc in the next 5 sts, sk 1 ch-sp, repeat from * to * to the end of the round, you’ll finish the round in the middle of a repeat, proceed for instructions on whether to join or not (160)
ALL SIZES: You can now remove all markers except the BOR marker. Proceed to ‘Body’ section.
Body (all sizes)
If you are NOT changing colors: proceed to R1.
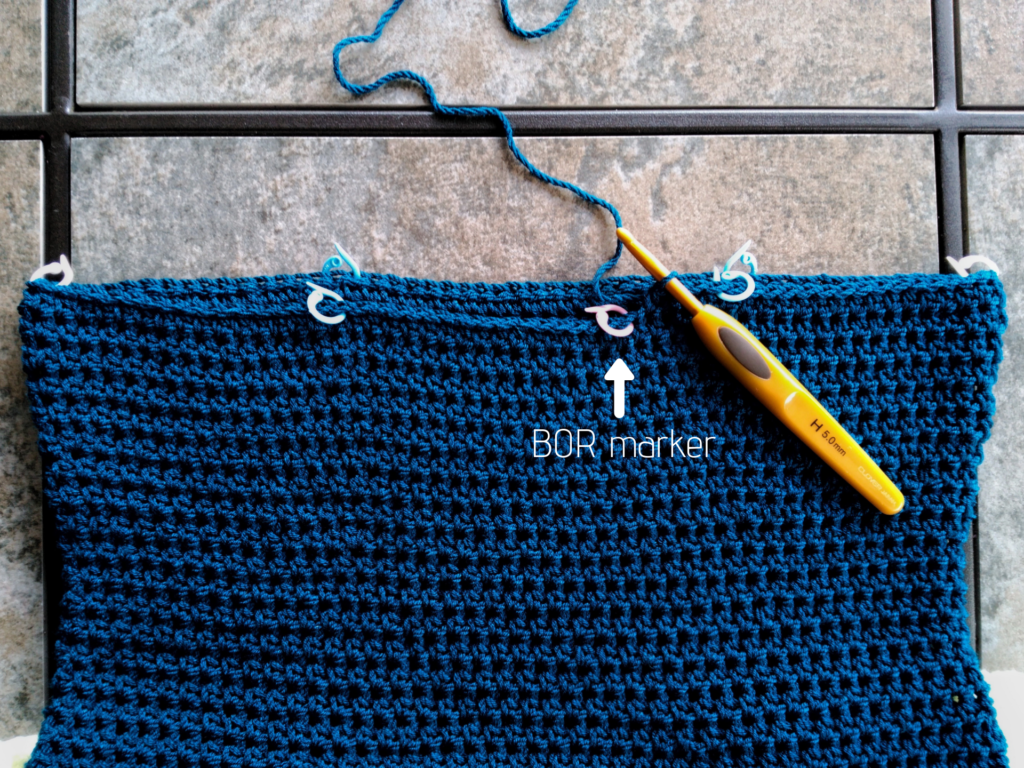
If you are changing colors: join with a sl st to the first sc of the round, changing colors as you finish the sl st, ch 1, hdc in the joining st and in each sc and ch around, sl st into the ch 1 before the first hdc made (does not count as a st), PM in the beginning st here and throughout, proceed to R2
Row count will now start back at 1 for all sizes
R1 sc in the next st, hdc in each st and ch around, DO NOT JOIN, do not ch, PM in the beginning st here and throughout (84, 98, 112, 124, 136, 148, 160)
R2-12(13, 14, 16, 18, 20, 22) hdc in each st around [For those who switched colors ONLY: hdc2tog over the next st (the last hdc of the round) and the sl st made at the beginning of the round using an invisible decrease. This just ensures there isn’t a gap between the two rounds (84, 98, 112, 124, 136, 148, 160)
Note: Try your piece on. It should now hit right at the bottom of your breasts. Add or subtract rows accordingly to get your piece to the correct length.
R13(14, 15, 17, 19, 21, 23) lay your work flat and place 6 markers as follows: 1 each directly under each underarm, 1 each directly under each breast, 1 each on the back even with the breast markers (see the photo below for reference) *hdc in each st to marker (remove marker), hdc2tog (using invisible decreases)* repeat from * to * around, hdc in each of any remaining sts (78, 92, 106, 118, 130, 142, 154)
R14(15, 16, 18, 20, 22, 24) hdc in each st around (78, 92, 106, 118, 130, 142, 154)
Note: Lay your work flat and place your markers appropriately every increase and decrease row as your BOR marker moves to the right a bit every row with continuous rounds. This is to ensure your increases and decreases are placed correctly for proper shaping.
R15(16, 17, 19, 21, 23, 25)-20 (21, 22, 24, 26, 28, 30) repeat R13 (14, 15, 17, 19, 21, 23)-R14 (15, 16, 18, 20, 22, 24) (60, 74, 88, 100, 112, 124, 136)
For the crop style ONLY: stop and proceed to hemline ribbing. At this point, your hemline should hit about 2” (5cm) above your belly button. Add or subtract rows according to your personal preference keeping in mind that you’ll add about an additional 1” (2.5cm) with the ribbing.
R21 (22, 23, 25, 27, 29, 31)-26 (27, 28, 30, 32, 34, 36) hdc in each st around (60, 74, 88, 100, 112, 124, 136)
Note: Your piece should now hit right at/below the belly button, just before you start to widen at the hips. If you have a longer or shorter torso you may add or subtract rows here to accommodate.
R27 (28, 29, 31, 33, 35, 37) lay your piece flat and place 6 markers around as before for the decreases, *hdc in each st to marker (remove marker), 2 hdc in the next st (inc)* repeat from * to * around, hdc in each of any remaining sts (66, 80, 94, 106, 118, 130, 142)
R28 (29, 30, 32, 34, 36, 38)-R29 (30, 31, 33, 35, 37, 39) hdc in each st around (66, 80, 94, 106, 118, 130, 142)
R30 (31, 32, 34, 36, 38, 40)-R41 (42, 43, 45, 47, 49, 51) repeat R27 (28, 29, 31, 33, 35, 37)-R29 (30, 31, 33, 35, 37, 39) (90, 104, 118, 130, 142, 154, 166)
R42 (43, 44, 46, 48, 50, 52)-R47 (48, 49, 51, 53, 55, 57) hdc in each st around (90, 104, 118, 130, 142, 154, 166)
For the tee style ONLY: stop and proceed to hemline ribbing. At this point, your hemline should hit right at about your hip bone. Add or subtract rows according to your personal preference keeping in mind that you’ll add about an additional 1” (2.5cm) with the ribbing.
R48 (49, 50, 52, 54, 56, 58)-R59 (60, 61, 63, 65, 67, 69) hdc in each st around (90, 104, 118, 130, 142, 154, 160)
Note: If you have a healthier (or less healthy) backend you may want to add or subtract rows here before you start the next decrease section. Your piece should now hit right at the bottom of your butt, just barely covering it.
R60 (61, 62, 64, 66, 68, 70) lay your piece flat and place 6 markers around as before, *hdc in each st to marker (remove marker), hdc2tog* repeat from * to * around, hdc in each of any remaining sts (74, 98, 112, 124, 136, 148, 160)
R61 (62, 63, 65, 67, 69, 71) hdc in each st around (74, 98, 112, 124, 136, 148, 160)
Note: If you have big hips you may want to skip the last decrease row of the next repeat sequence. My dress is pretty snug pulling it down over my hips.
R62 (63, 64, 66, 68, 70, 72)-R69 (70, 71, 73, 75, 77, 79) repeat R60 (61, 62, 64, 66, 68, 70)-61 (62, 63, 65, 67, 69, 71) (50, 74, 88, 100, 112, 124, 136)
R70 (71, 72, 74, 76, 78, 80)-81 (82, 83, 85, 87, 89, 91) hdc in each st around (50, 74, 88, 100, 112, 124, 136)
Add or subtract rows here according to your personal length preference, keeping in mind that you’ll add about an additional 1” (2.5cm) with the ribbing.
Hemline Ribbing (all sizes)
Before you begin the ribbing, sc in the next st, sl st in the next 2 sts (this just evens out the hemline so there’s no drop at the end of your last row),
Foundation/R1 (switching to 4mm hook) ch 7, sc in the back bump of the 2nd ch and the next 5 ch, sl st into the next 2 unworked sts of the base at the hemline, do not ch, turn to work into the sc sts just made (6 sc)
R2 scBLO in each st across, ch 1, turn (6 sc)
R3 scBLO in each st across, sl st into the next 2 unworked sts of the base at the hemline, do not ch, turn (6 sc)
Repeat R2-3 around your entire hemline, ch 1, turn
Seaming
Working on the inside of your piece, sl st the first and last rows of the ribbing together through the FLO of the row closest to you and the BLO of the row farthest from you as seen in the photo below

Tank/Cap Sleeves (all sizes, both sleeves)
You may leave it as it is or if you’d like a more finished look simply sc in each dc around the armhole opening skipping the ch-sp in between all DVSTs and all ch-sp in the middle of all DVSTs. When you get to the center of the armpit, place 2-3 sc evenly across and continue around. Join with a sl st or an invisible join and finish off.
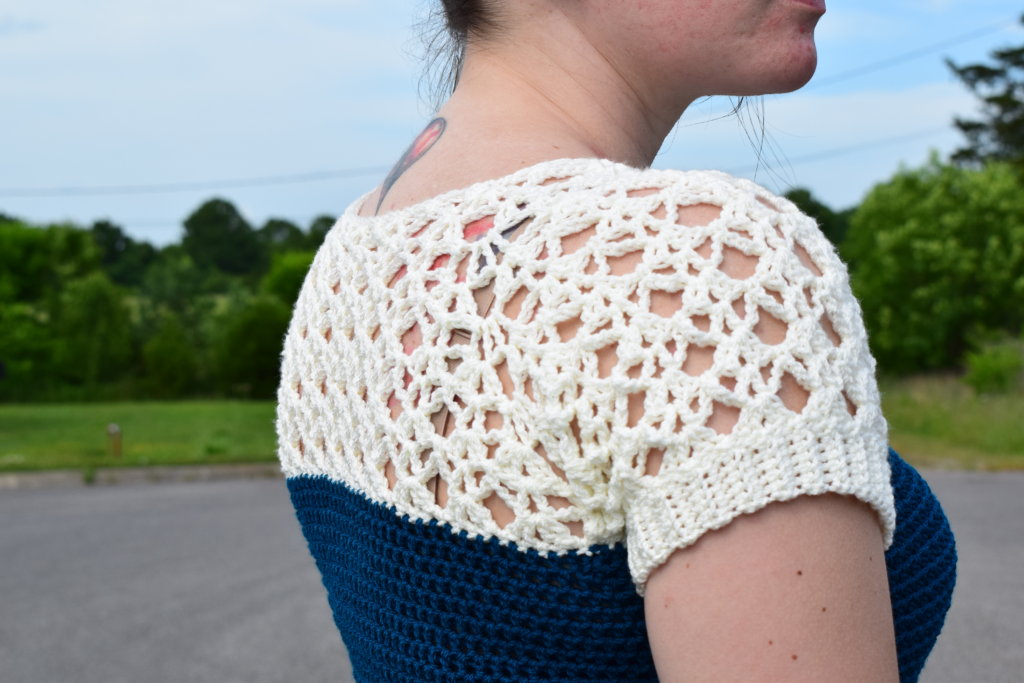
Short Sleeves (all sizes, both sleeves)
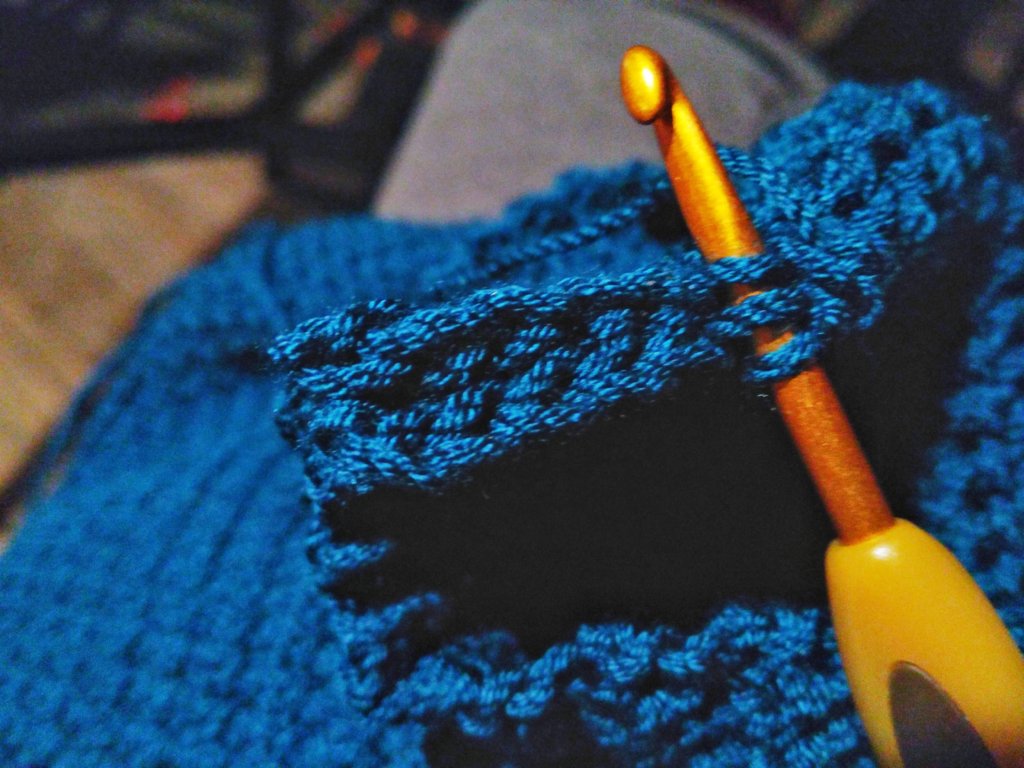
R1 (switching back to 5mm hook) Attach your yarn with a sl st in the ch-sp in the middle of the DVST to the right of the center of the armpit as seen in the photo below

R1 (cont’d) ch 3 (counts as 1 dc and ch 1), dc in the same ch-sp, ch 3, sk next ch-sp, sc in the ch 1 of the split round between the skipped ch-sp and the next ch-sp, ch 3, sk next ch-sp (see photo below for reference) *VST in the next ch-sp, ch 3, sc in the next ch-sp, ch 3* repeat from * to * around, sl st to the 2nd ch of the beginning ch 3

R2 sl st in the BLO of the next ch, sl st around the same ch, sc, ch 1 (counts as 1 dc) in the same ch-sp, [dc, ch 1, 2 dc] in the same ch-sp, ch 1, sk next 2 ch-sp, *DVST in the next VST ch-sp, ch 1, sk next 2 ch-sp* repeat from * to * around, join with a sl st to the top of the beginning dc
R3 sl st in the BLO of the next dc, sl st in the BLO of the next ch, sl st around the ch, ch 3 (counts as 1 dc and ch 1), sk next ch-sp, dc in the next DVST ch-sp, ch 3, sc in the next ch-sp, ch 3, *VST in the next ch-sp, ch 3, sc in the next ch-sp, ch 3* repeat from * to * around, sl st to the 2nd ch of the beginning ch 3
R4 repeat R2
Sizes 2X-3X ONLY:
Repeat R3-4 once more
Short Sleeve Ribbing (all sizes, both sleeves)
R1 (switching to 4mm hook) ch 7, sc in the 2nd ch from hook and each ch across, sl st in the next unworked dc of the base row, sl st in the next ch-sp, do not ch, turn to work into the previous sc made
R2 scBLO in the next 6 sts, ch 1, turn
R3 sc BLO in each st across, sk next unworked dc of the base row, sl st into the next unworked dc, sl st into the next unworked ch-sp, do not ch, turn
Repeat R2-3 around
Seaming
Working on the inside of your piece, sl st the first and last rows of the ribbing together through the FLO of the row closest to you and the BLO of the row farthest from you as seen in the photo below
Long Sleeves (all sizes, both sleeves)
R1 (Switching back to 5mm hook) Attach your yarn with a sl st in the ch-sp of the DVST to the right of the center of the armpit as seen in the photo below
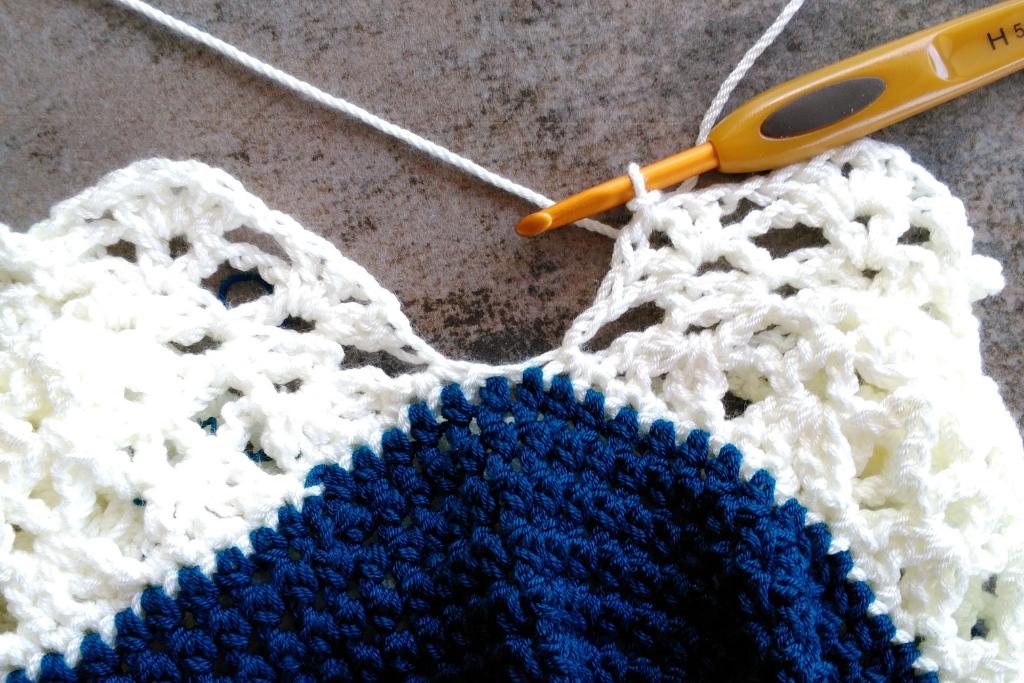
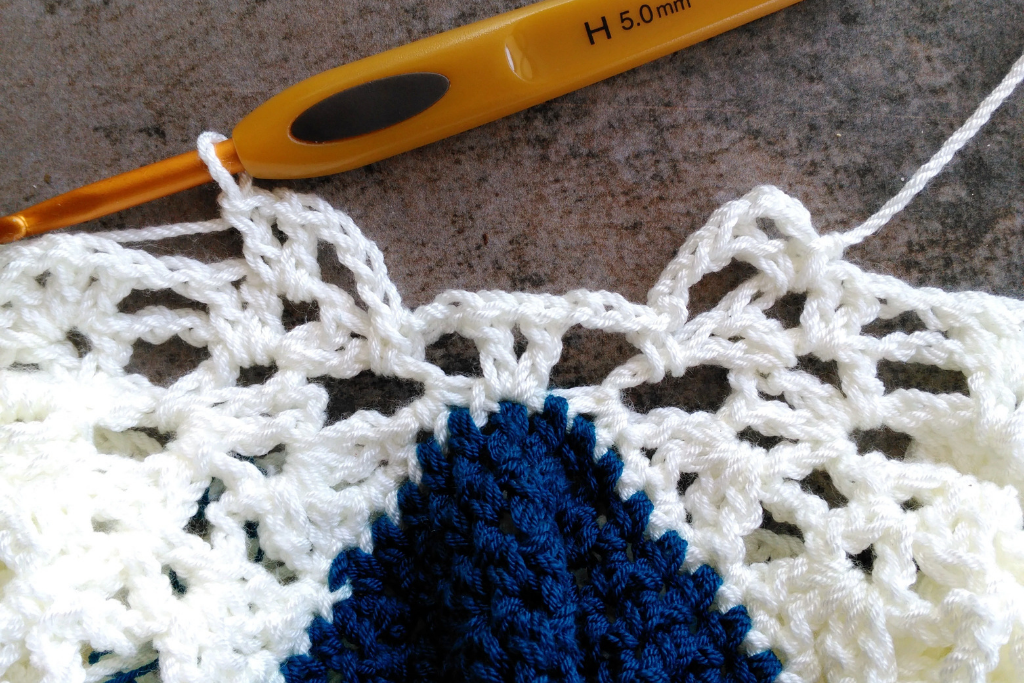
R1 (cont’d) ch 3 (counts as 1 dc and ch 1), dc in the same ch-sp, ch 3, sc in the next ch-sp, ch 3, VST in the sc between the last worked ch-sp and the next ch-sp, ch 3, sc in the next ch-sp (see photo below for reference) *VST in the next ch-sp, ch 3, sc in the next ch-sp, ch 3* repeat from * to * around, sl st to the 2nd ch of the beginning ch 3
R2 sl st in the BLO of the next ch, sl st around the same ch, sc, ch 1 (counts as 1 dc) in the same ch-sp, [dc, ch 1, 2 dc] in the same ch-sp, ch 1, sk next 2 ch-sp, *DVST in the next VST ch-sp, ch 1, sk next 2 ch-sp* repeat from * to * around, join with a sl st to the top of the beginning dc
R3 sl st in the BLO of the next dc, sl st in the BLO of the next ch, sl st around the ch, ch 3 (counts as 1 dc and ch 1), dc in the same ch-sp, ch 3, sc in the next ch-sp, ch 3, *VST in the next ch-sp, ch 3, sc in the next ch-sp, ch 3* repeat from * to * around, sl st to the 2nd ch of the beginning ch 3
Note: If you have longer or shorter arms you may want to add or subtract an even number of rows in the next repeat sequence. Your sleeve should cover your wrist completely but should not cover much of your hand. Once the ribbing is added it sits nicely right on the wrists.
R4-31 (33, 33, 35, 35, 37, 37) repeat R2-3
R32 (34, 34, 36, 36, 39, 39) repeat R2 once more
Long Sleeve Ribbing (all sizes, both sleeves)
R1 (switching to 4mm hook) ch 7, sc in the 2nd ch from hook and each ch across, slst2tog over the next unworked dc and ch of the base row, sk next unworked dc, slst2tog over the next unworked dc and ch of the base row, do not ch, turn to work into the previous sc made
R2 scBLO in the next 6 sts, ch 1, turn
R3 scBLO in each st across, sk next unworked dc of the base row, slst2tog over the next unworked dc and the ch of the base row, sk next unworked dc, slst2tog over the next unworked dc and ch of the base row, do not ch, turn
Repeat R2-3 around
Seaming
Working on the inside of your piece, sl st the first and last rows of the ribbing together through the FLO of the row closest to you and the BLO of the row farthest from you as seen in the photo below
Finish off, weave in your ends, and go strut your stuff, girlfriend!
I really hope you loved making Coralyn as much as I loved designing her! She’s such a versatile piece and will make a great addition to any and every wardrobe! Trust me when I say once you make the first one, you’ll want to make one in every combination! But who has the time for that, eh? 😉

As always, this modern crochet pattern will remain free on the blog forever, with ads. Click here if you’d like to purchase an ad-free and easy to read PDF.
Happy making friend!

2 Comments
carol manuel
very very pretty
Chantal Barnett
thank you so very much!