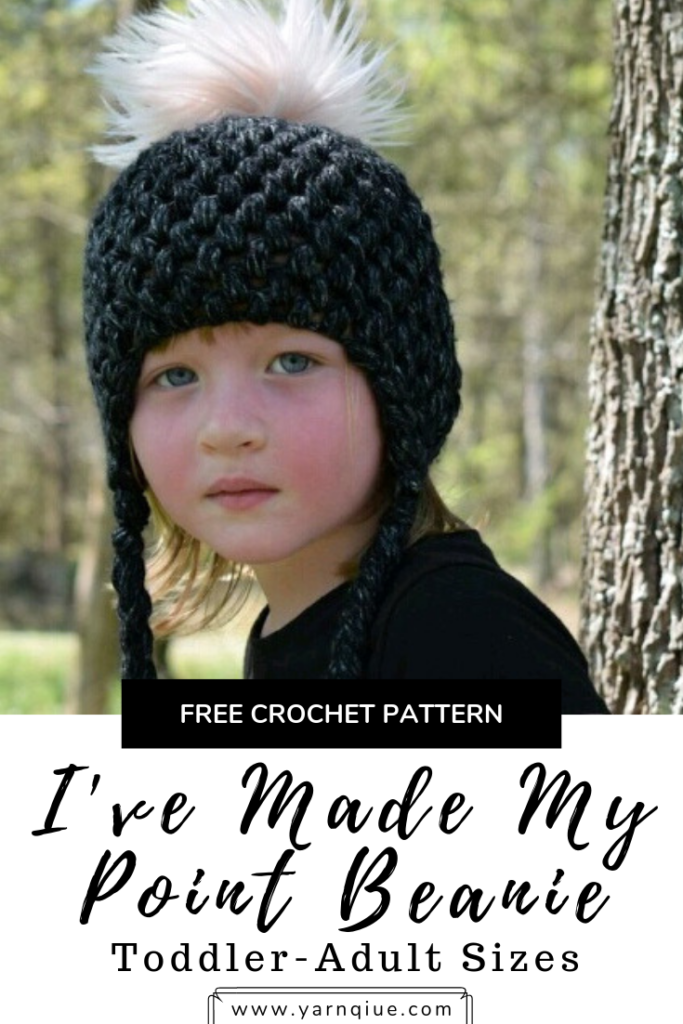
I’ve Made My Point Beanie (Free Crochet Pattern)
Introduction
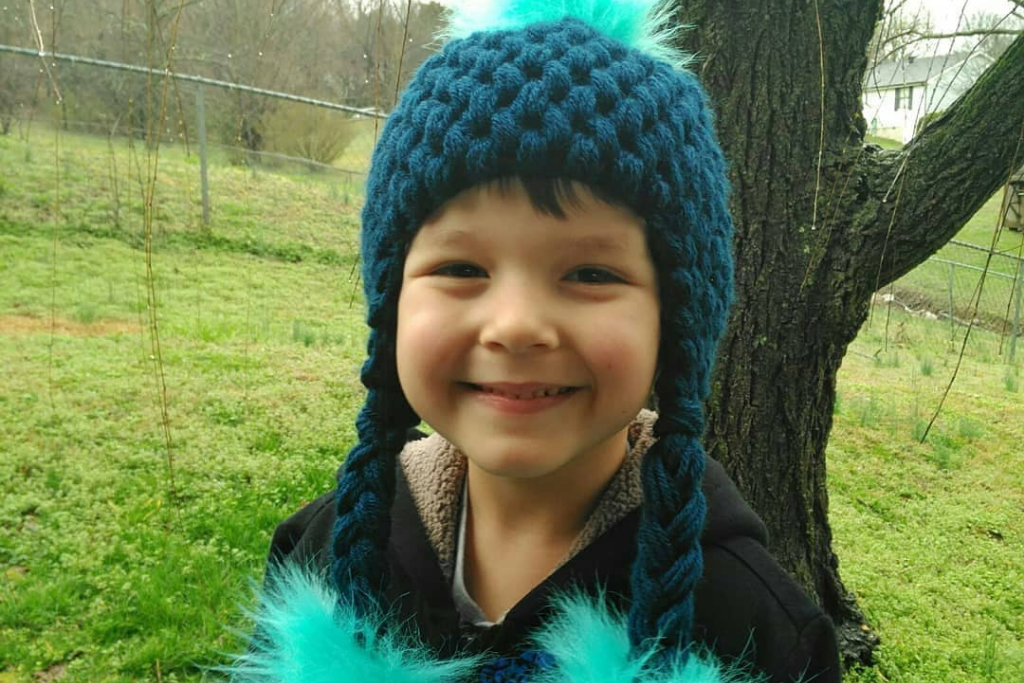
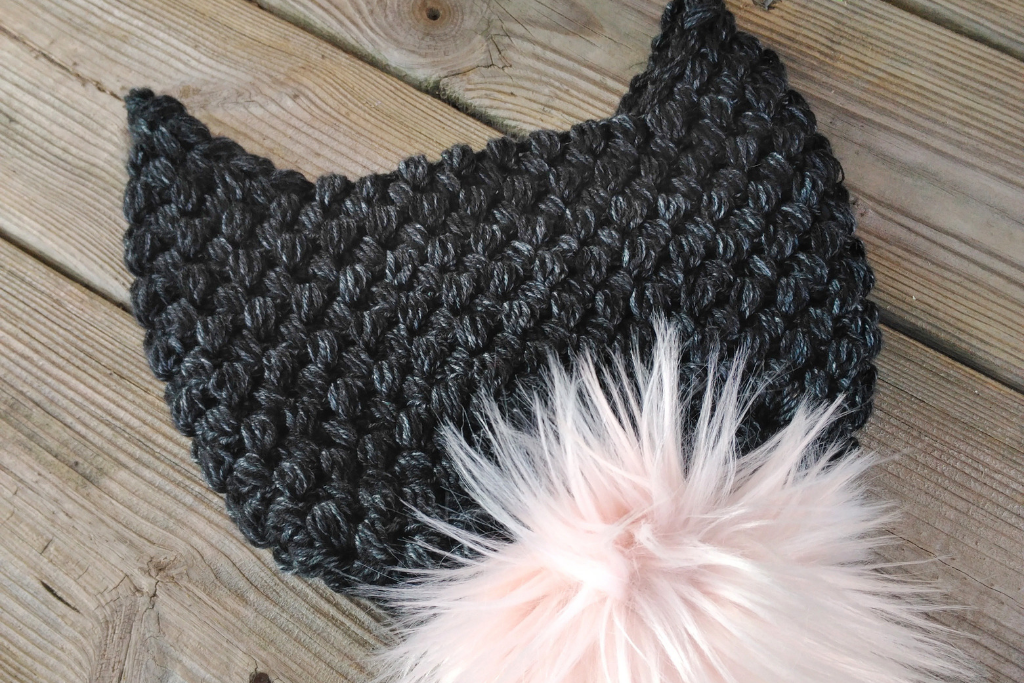
Meet the I’ve Made My Point Beanie, sister accessory to my I’ve Made My Point Triangle Cowl. Made using lots of puff stitches, it is a bit of a yarn eater but will keep you so nice and toasty!
Inspiration
The inspiration for this beanie came almost as soon as I was finished with my I’ve Made My Point Triangle Cowl. I’ve always loved earflap hats like this and thought the start of my cowl pattern would be perfect for the points for the earflaps on this one. The fact that’s it’s made using entirely puff stitches makes it extra warm and cozy. Don’t let those gaps fool ya’ 😉
About the Yarn
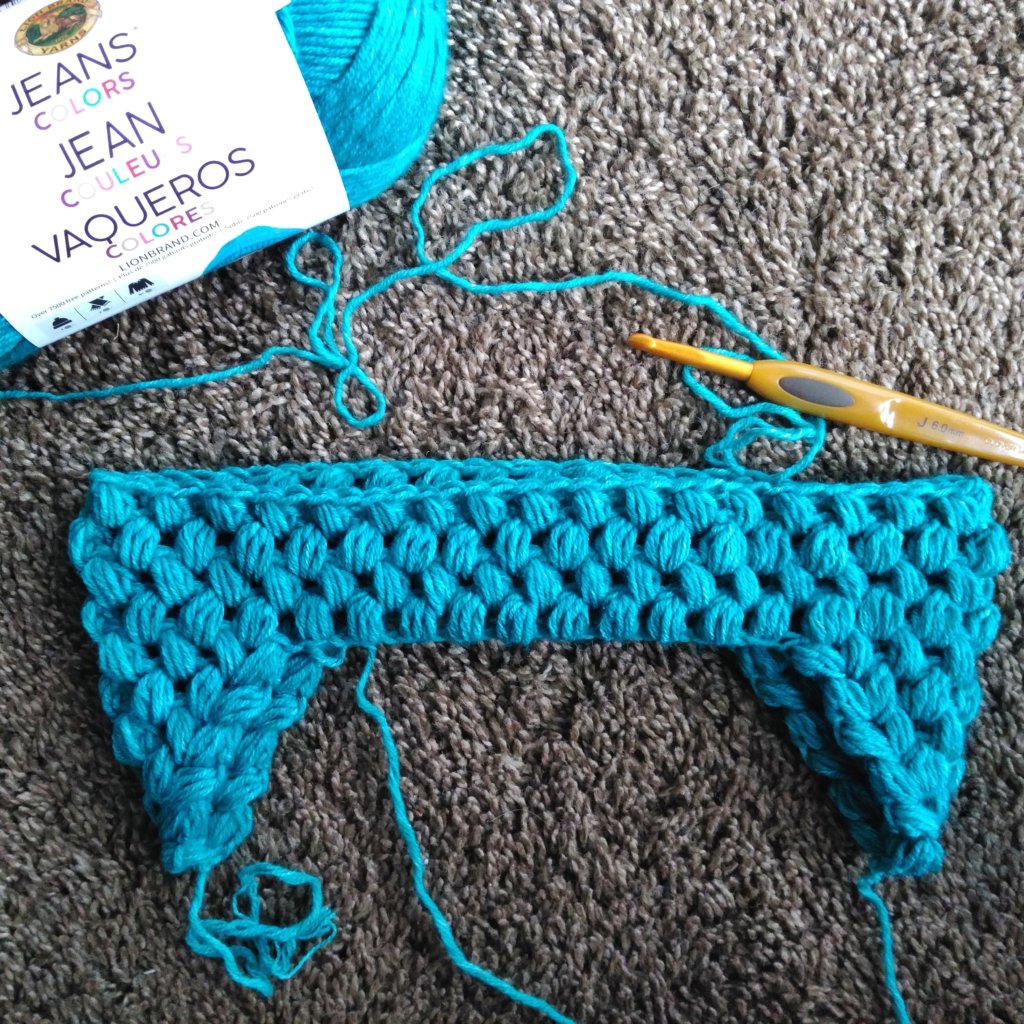
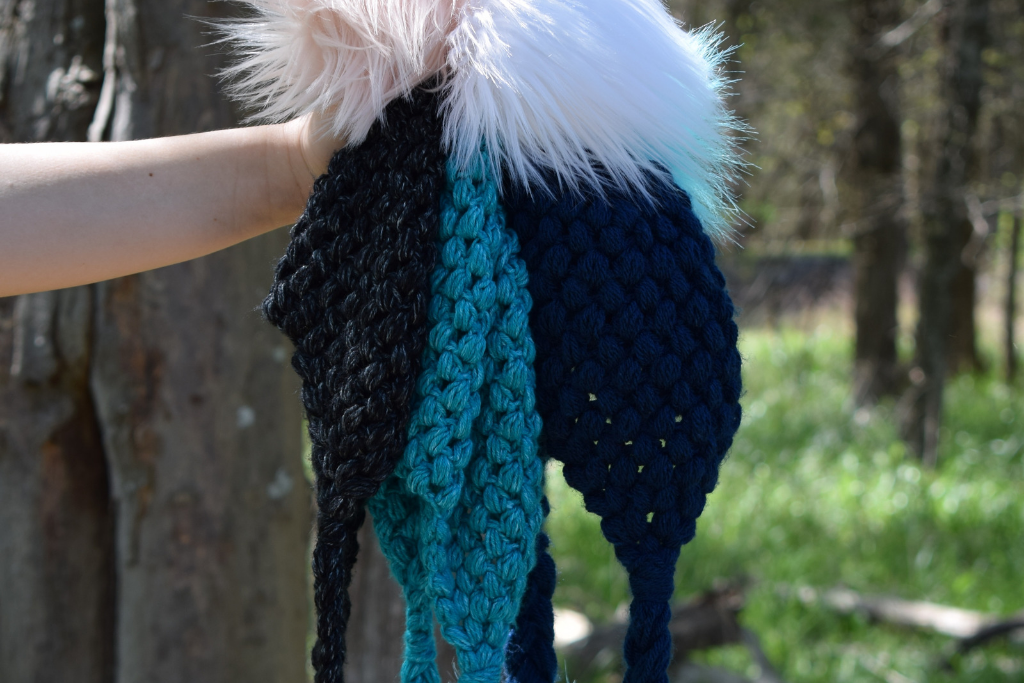
For the black and teal hats in my photos I used Lion Brand Jeans Colors in the colorways Stovepipe and Capri. For the deeper blue one I used Lion Brand Vanna’s Choice. You can use any worsted weight yarn you’d like, just be sure to check your gauge. I had to go down in hook size a bit for the Vanna’s Choice as it’s a little heavier than the Jeans yarns.
Some other yarns I would recommend for this project are:
Techniques Used
If you love puff stitches, you’re going to love making this beanie! It’s made of nothing but those glorious, puffy, warmth-inducing stitches and I love it. Once you get the hang of it, you’ll have this beanie whipped up in no time. This pattern is considered an intermediate pattern but is suitable for advanced beginners also. The only semi-difficult part is getting down the increases and decreases and joining the earflaps to start the body. There are lots of photos to help you out with the joining, though.
Skill Level
Intermediate
Gauge
6 sts and 10 rows of puff stitches is 4” x 4”
Sizing
Toddler (1-3 years, 18-19”)
Child (4-10 years, 19-20”)
Teen/Small Adult (20-21”)
Adult (21-23”)
Materials
175-250 yards worsted weight yarn (see ‘About the Yarn’ section above for the yarns I used and recommended substitutions)
US Size J/10/6mm crochet hook (I use these!)
Tapestry needle for weaving in ends (I use these!)
Scissors (These Fiskars are my fav!)
Faux fur poms or pom pom maker (I use these!) (optional)
Notes
-Each size is written separately. Figure photos are found towards the bottom of the post.
-There is little to no ease for this pattern. Check your gauge before beginning.
-Please note that the puff stitches, puff stitch clusters, and puff stitch 2 together all include a ch 1 at the end of the stitch so they are not indicated within the pattern, there is always a ch 1 after each.
-When joining to the top of a puff stitch, sl st into the ch 1 that closes the ps.
-* * indicates a repeat
-(xx) at the end of a row/round indicates how many total stitches for that row/round
Stitch Index
R-row/round
st(s)-stitch(es)
ch-chain
ch-sp-chain space
sk-skip
sl st-slip stitch
yo-yarn over
sc-single crochet
ps-puff stitch (yo, insert hook and pull up a loop 4 times, yo and pull through all 9 loops on hook, ch 1)
pscl-puff stitch cluster ([ps, ch 1, ps, ch 1] in indicated stitch)
ps2tog-puff stitch 2 together (decrease) (*yo, insert hook and pull up a loop 4 times* in 1st ch-sp [9 loops on hook], repeat from * to * in 2nd ch-sp [17 loops on hook], yo and pull through all 17 loops on hook, ch 1)
Get an affordable, easy to read PDF on Ravelry, Etsy, or LoveCrafts!
Pattern
Toddler (1-3 years, 18-19”)
Earflaps (make 2):
Foundation: ch 3, sc in 1st ch, ch 1, turn
R1 [3 ps] in ch-sp, turn (3 ps)
R2 pscl in each ch-sp, turn (2 pscl)
R3 repeat R2, turn (3 pscl)
R4 pscl in 1st ch-sp, ps in next 3 ch-sp, pscl in last ch-sp, turn (2 pscl and 3 ps)
Earflap #1: ch 15, break yarn
Earflap #2: ch 11, continue to body of hat
Body:
**From here to end: on the first ps of the round ONLY, yo once less for a total of 7 loops opposed to 9 total loops. This, along with the extra ch at the end of each row, makes for a more seamless join and beginning.
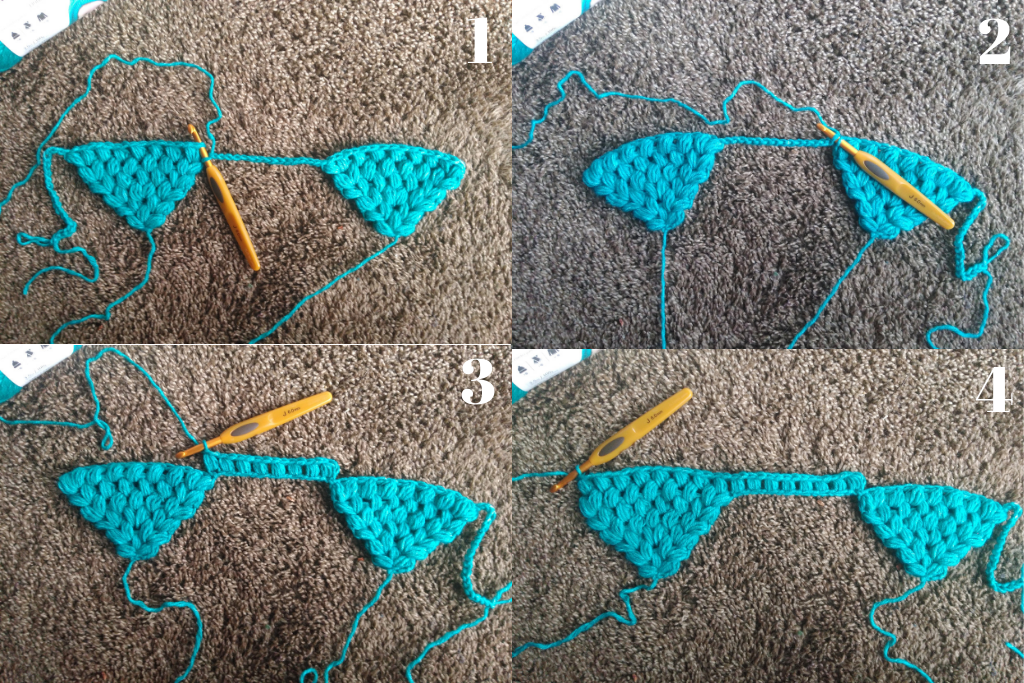
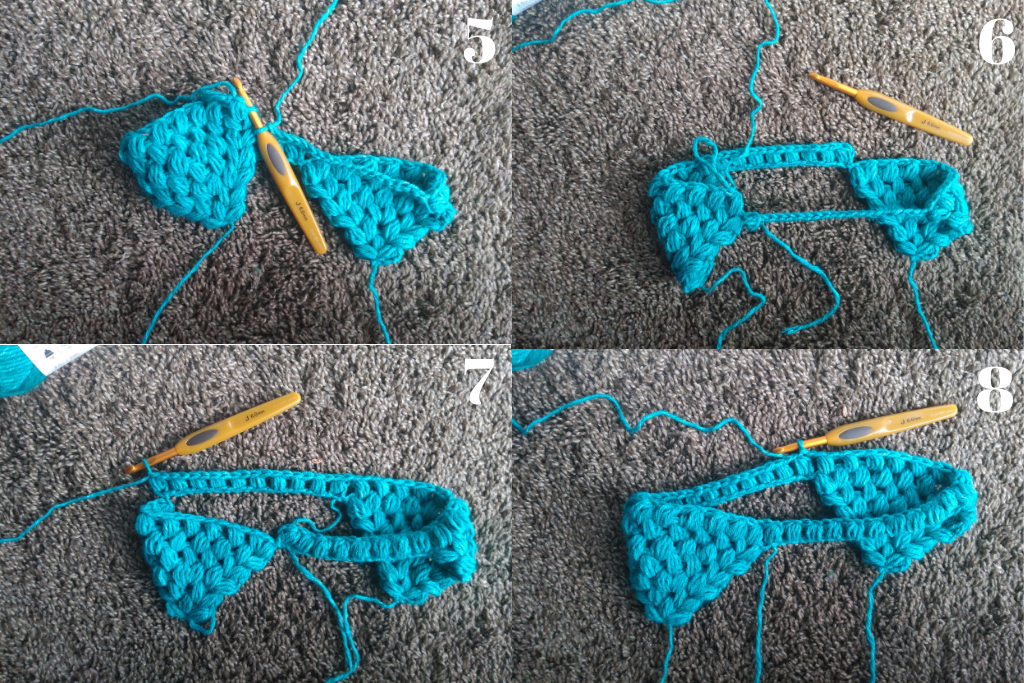
R1 sl st to the top of the ps on the right side of Earflap #1 (see Figure 1), do not ch, turn, sl st into 1st ch (see Figure 2), ch 1, ps into same ch, *sk 1 ch, ps in next ch* to last ch (see Figure 3), ps in each ch-sp of Earflap #1 (see Figure 4), remove hook, insert hook into last ch of Earflap #1 and join with a sl st to the top of the ps on the right side of previous row of Earflap #2 (see Figure 5), pull loop all the way through to ‘finish off’ (see Figure 6) and return your hook to the last ps made, ps in 1st ch, sk 1 ch, ps in next ch to last ch (see Figure 7), ps in each ch-sp of Earflap #2, ch 1 (2 ch total between last and first ps here and throughout), join (see Figure 8), do not ch, turn (26 ps)
R2-8 sl st into 1st ch-sp, ch 1, ps in same space, ps in each ch- sp around, ch 1, join, do not ch, turn (26 ps)
Your hat should now measure about 3 1/4″ from the straight edges.
Begin decreases:
R9 sl st into 1st ch-sp, ch 1, ps2tog, ps in next 3 ch-sp around (there will be 4 ps after the last ps2tog, ch 1, join, do not ch, turn (5 ps2tog and 16 ps)
R10 sl st into 1st ch-sp, ch 1, ps in same ch-sp and next 2 ch- sp, ps2tog, ps in next 2 ch-sp, ps2tog around ch 1, join, do not ch, turn (5 ps2tog and 11 ps)
R11 sl st into 1st ch-sp, sl st into top of next ps, sl st into next ch-sp, ch 1, ps in same ch-sp, ps2tog, ps around, ch 1, join, do not ch, turn (5 ps2tog and 6 ps)
R12 sl st into 1st ch-sp, ch 1, ps2tog 5 times, ps, ch 1, join (5 ps2tog and 1 ps)
Break yarn leaving a 6” tail. Thread your tail and weave through the ch-sps of the last round, cinch closed and weave in end.
Cut 16 (for each side) 24” strands of yarn, fold in half and attach fringe style to the bottom of the earflap. Divide into 3 sections and braid loosely, knot the end. Add pom poms if you wish, weave in ends and you’re finished!
Child (4-10 years, 19-20”)
Earflaps (make 2):
Foundation: ch 3, sc in 1st ch, ch 1, turn
R1 [3 ps] in ch-sp, turn (3 ps)
R2 pscl in each ch-sp, turn (2 pscl)
R3 repeat R2, turn (3 pscl)
R4 pscl in 1st ch-sp, ps in next 3 ch-sp, pscl in last ch-sp, turn (2 pscl and 3 ps)
R5 pscl in 1st ch-sp, ps in next 4 ch-sp, pscl in last ch-sp, turn (2 pscl and 4 ps)
Earflap #1: ch 15, break yarn
Earflap #2: ch 11, continue to body of hat
Body:
**From here to end: on the first ps of the round ONLY, yo once less for a total of 7 loops opposed to 9 total loops. This, along with the extra ch at the end of each row, makes for a more seamless join and beginning.
R1 sl st to the top of the ps on the right side of Earflap #1 (see Figure 1), do not ch, turn, sl st into 1st ch (see Figure 2), ch 1, ps into same ch, *sk 1 ch, ps in next ch* to last ch (see Figure 3), ps in each ch-sp of Earflap #1 (see Figure 4), remove hook, insert hook into last ch of Earflap #1 and join with a sl st to the top of the ps on the right side of previous row of Earflap #2 (see Figure 5), pull loop all the way through to ‘finish off’ (see Figure 6) and return your hook to the last ps made, ps in 1st ch, sk 1 ch, ps in next ch to last ch (see Figure 7), ps in each ch-sp of Earflap #2, ch 1 (2 ch total between last and first ps here and throughout), join (see Figure 8), do not ch, turn (28 ps)
R2-9 sl st into 1st ch-sp, ch 1, ps in same space, ps in each ch- sp around, ch 1, join, do not ch, turn (28 ps)
Your hat should now measure about 3 1/2″ from the straight edges.
Begin decreases:
R10 sl st into 1st ch-sp, ch 1, ps2tog, ps in next 5 ch-sp around, ch 1, join, do not ch, turn (4 ps2tog and 20 ps)
R11 sl st into 1st ch-sp, sl st into top of next ps, sl st into next ch-sp, ch 1, ps in same ch-sp, ps2tog, ps in next ch-sp, ps2tog around ch 1, join, do not ch, turn (8 ps2tog and 8 ps)
R12 sl st into 1st ch-sp, ch 1, ps2tog around, ch 1, join, do not ch, turn (8 ps2tog)
R13 repeat R12 (4 ps2tog)
Break yarn leaving a 6” tail. Thread your tail and weave through the ch-sps of the last round, cinch closed and weave in end.
Cut 18 (for each side) 26” strands of yarn, fold in half and attach fringe style to the bottom of the earflap. Divide into 3 sections and braid loosely, knot the end. Add pom poms if you wish, weave in ends and you’re finished!
Teen/Small Adult (20-21”)
Earflaps (make 2):
Foundation: ch 3, sc in 1st ch, ch 1, turn
R1 [3 ps] in ch-sp, turn (3 ps)
R2 pscl in each ch-sp, turn (2 pscl)
R3 repeat R2, turn (3 pscl)
R4 pscl in 1st ch-sp, ps in next 3 ch-sp, pscl in last ch-sp, turn (2 pscl and 3 ps)
R5 pscl in 1st ch-sp, ps in next 4 ch-sp, pscl in last ch-sp, turn (2 pscl and 4 ps)
R6 pscl in 1st ch-sp, ps in next 5 ch-sp, pscl in last ch-sp, (2 pscl and 5 ps)
Earflap #1: ch 11, break yarn
Earflap #2: ch 15, continue to body of hat
Body:
**From here to end: on the first ps of the round ONLY, yo once less for a total of 7 loops opposed to 9 total loops. This, along with the extra ch at the end of each row, makes for a more seamless join and beginning.
R1 sl st to the top of the ps on the right side of Earflap #1 (see Figure 1), do not ch, turn, sl st into 1st ch (see Figure 2), ch 1, ps into same ch, *sk 1 ch, ps in next ch* to last ch (see Figure 3), ps in each ch-sp of Earflap #1 (see Figure 4), remove hook, insert hook into last ch of Earflap #1 and join with a sl st to the top of the ps on the right side of previous row of Earflap #2 (see Figure 5), pull loop all the way through to ‘finish off’ (see Figure 6) and return your hook to the last ps made, ps in 1st ch, sk 1 ch, ps in next ch to last ch (see Figure 7), ps in each ch-sp of Earflap #2, ch 1 (2 ch total between last and first ps here and throughout), join (see Figure 8), do not ch, turn turn (30 ps)
R2-10 sl st into 1st ch-sp, ch 1, ps in same space, ps in each ch-sp around, ch 1, join, do not ch, turn (30 ps)
Your hat should now measure about 4″ from the straight edges.
Begin decreases:
R11 sl st into 1st ch-sp, ch 1, ps2tog, ps in next 4 ch-sp around, ch 1, join, do not ch, turn (5 ps2tog and 20 ps)
R12 sl st into 1st ch-sp, sl st into top of next ps, sl st into next ch-sp, ch 1, ps in same ch-sp, ps in next 2 ch-sp, ps2tog, ps in next 3 ch- sp, ps2tog around ch 1, join, do not ch, turn (5 ps2tog and 15 ps)
R13 sl st into 1st ch-sp, ch 1, ps2tog, ps in next 2 ch-sp around, ch 1, join, do not ch, turn (5 ps2tog and 10 ps)
R14 sl st into 1st ch-sp, sl st into top of next ps, sl st into next ch-sp, ch 1, ps in same ch-sp, ps2tog, ps in next ch-sp, ps2tog around, ch 1, join, do not ch, turn (5 ps2tog and 5 ps)
R15 sl st into 1st ch-sp, ch 1, ps2tog around (5 ps2tog)
Break yarn leaving a 6” tail. Thread your tail and weave through the ch-sps of the last round, cinch closed and weave in end.
Cut 21 (for each side) 28” strands of yarn, fold in half and attach fringe style to the bottom of the earflap. Divide into 3 sections and braid loosely, knot the end. Add pom poms if you wish, weave in ends and you’re finished!
Adult (21-23”)
Earflaps (make 2)
Foundation: ch 3, sc in 1st ch, ch 1, turn
R1 [3 ps] in ch-sp, turn (3 ps)
R2 pscl in each ch-sp, turn (2 pscl)
R3 repeat R2, turn (3 pscl)
R4 pscl in 1st ch-sp, ps in next 3 ch-sp, pscl in last ch-sp, turn (2 pscl and 3 ps)
R5 pscl in 1st ch-sp, ps in next 4 ch-sp, pscl in last ch-sp, turn (2 pscl and 4 ps)
R6 pscl in 1st ch-sp, ps in next 5 ch-sp, pscl in last ch-sp, (2 pscl and 5 ps)
Earflap #1: ch 19, break yarn
Earflap #2: ch 15, continue to body of hat
Body
**From here to end: on the first ps of the round ONLY, yo once less for a total of 7 loops opposed to 9 total loops. This, along with the extra ch at the end of each row, makes for a more seamless join and beginning.
R1 sl st to the top of the ps on the right side of Earflap #1 (see Figure 1), do not ch, turn, sl st into 1st ch (see Figure 2), ch 1, ps into same ch, *sk 1 ch, ps in next ch* to last ch (see Figure 3), ps in each ch-sp of Earflap #1 (see Figure 4), remove hook, insert hook into last ch of Earflap #1 and join with a sl st to the top of the ps on the right side of previous row of Earflap #2 (see Figure 5), pull loop all the way through to ‘finish off’ (see Figure 6) and return your hook to the last ps made, ps in 1st ch, sk 1 ch, ps in next ch to last ch (see Figure 7), ps in each ch-sp of Earflap #2, ch 1 (2 ch total between last and first ps here and throughout), join (see Figure 8), do not ch, turn (34 ps)
R2-10 sl st into 1st ch-sp, ch 1, ps in same space, ps in each ch-sp around, ch 1, join, do not ch, turn (34 ps)
Your hat should now measure about 4″ from the straight edges.
Begin decreases
R11 sl st into 1st ch-sp, ch 1, ps2tog, ps in next 3 ch-sp around (there will be 2 ps after the last ps2tog), ch 1, join, do not ch, turn (7 ps2tog and 20 ps)
R12 sl st into 1st ch-sp, sl st into top of next ps, sl st into next ch-sp, ch 1, ps in same ch-sp, ps2tog, ps in next 2 ch-sp, ps2tog around ch 1, join, do not ch, turn (7 ps2tog and 13 ps)
R13 sl st into 1st ch-sp, ch 1, ps2tog, ps in next 4 ch-sp, ps2tog around, ch 1, join, do not ch, turn (4 ps2tog and 12 ps)
R14 sl st into 1st ch-sp, ch 1, ps2tog, ps in next 3 ch-sp around (there will be 4 ps after the last ps2tog), ch 1, join, do not ch, turn (3 ps2tog and 10 ps)
R15 sl st into 1st ch-sp, ch 1 ps2tog around, ch 1, join (8 ps2tog)
Break yarn leaving a 6” tail. Thread your tail and weave through the ch-sps of the last round, cinch closed and weave in end.
Cut 24 (for each side) 28” strands of yarn, fold in half and attach fringe style to the bottom of each earflap. Divide into 3 sections and braid loosely, knot the end. Add pom poms if you wish, weave in ends and you’re finished!
Figure Photos
I hope you enjoyed making this puffalicious beanie. These are great to make for yourself, the kids, gifts for loved ones, or if you sell your makes. Any recipient is sure to have a warm head this cold season! Don’t forget to pin it for later and to share with your friends!!
Get an affordable, easy to read PDF on Ravelry, Etsy, or LoveCrafts!
Click here to get your FREE PDF for a limited time!
If you make something inspired by my blog, I would love to see! Share it on social media and tag me!! Seeing you make my patterns just makes my day 🙂
Happy making friend!