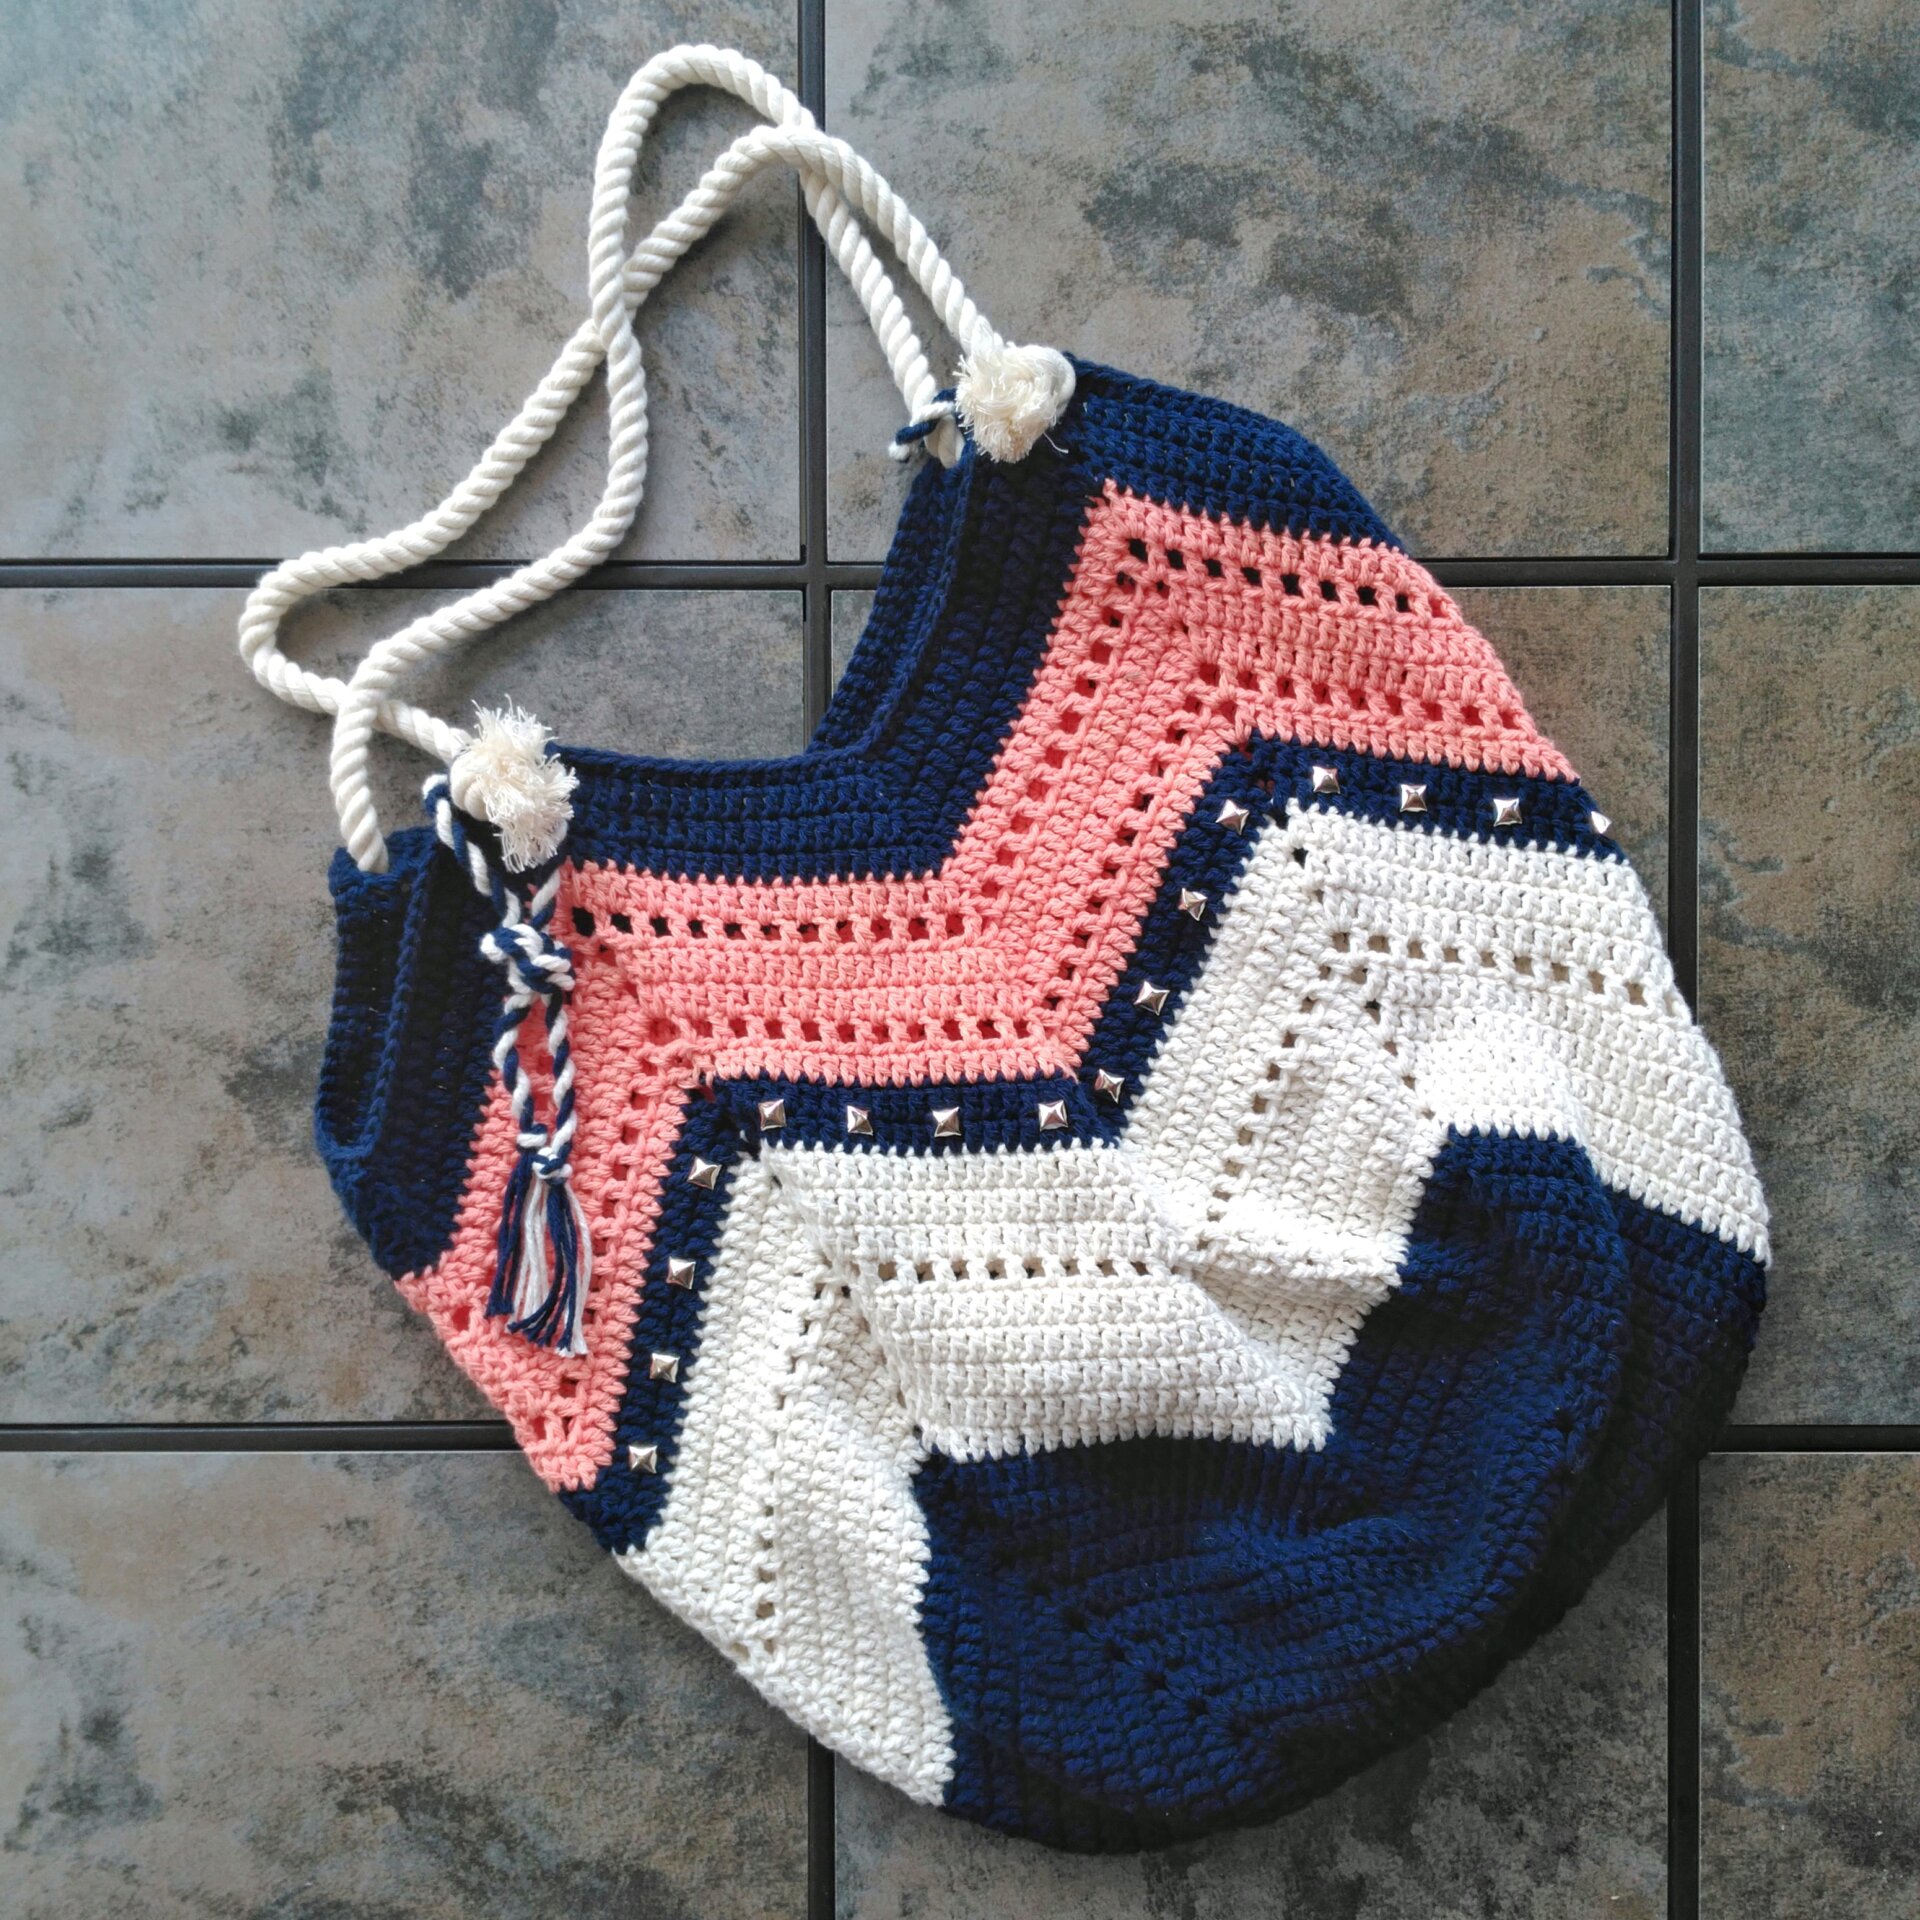
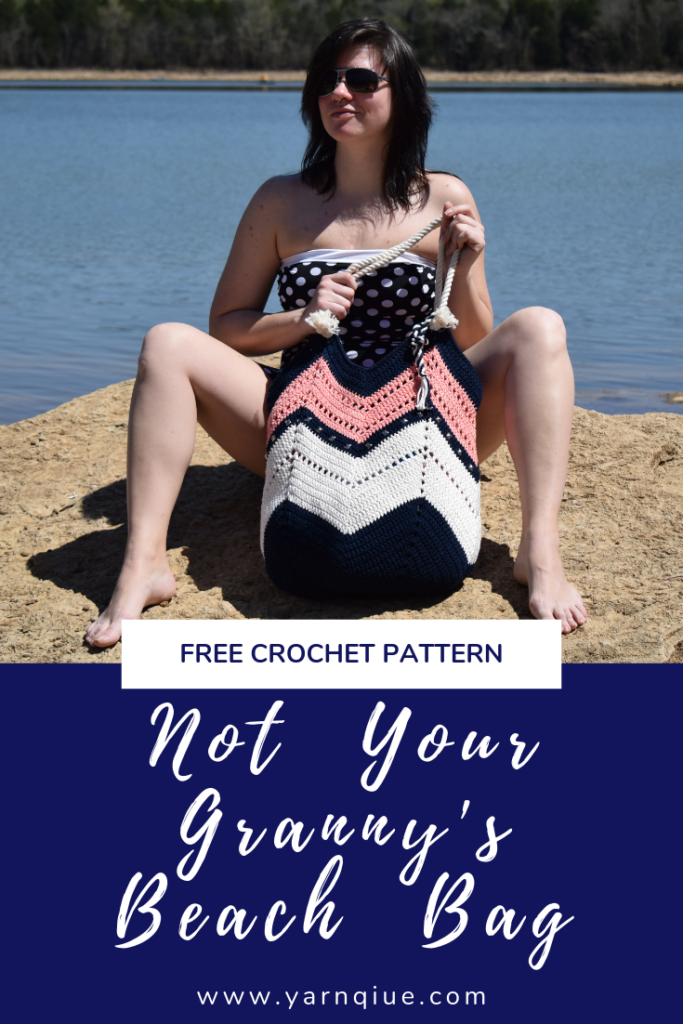
Not Your Granny’s Beach Bag (Free Crochet Bag Pattern)
Introduction
Have you seen granny square bag patterns and wondered exactly how they’re made? Welp, you’re in the right place, my friend. This free crochet pattern using only basic crochet stitches is going to show you how to make a solid granny square and how to then turn it into a modern beach bag with a fun punk(ish) finish.
Inspiration
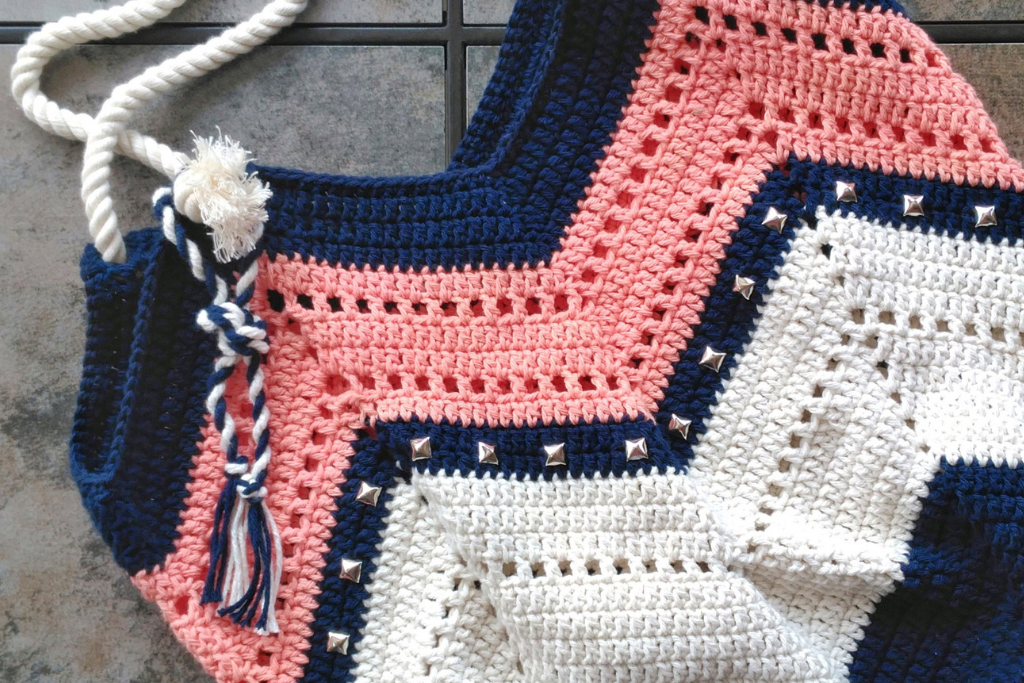
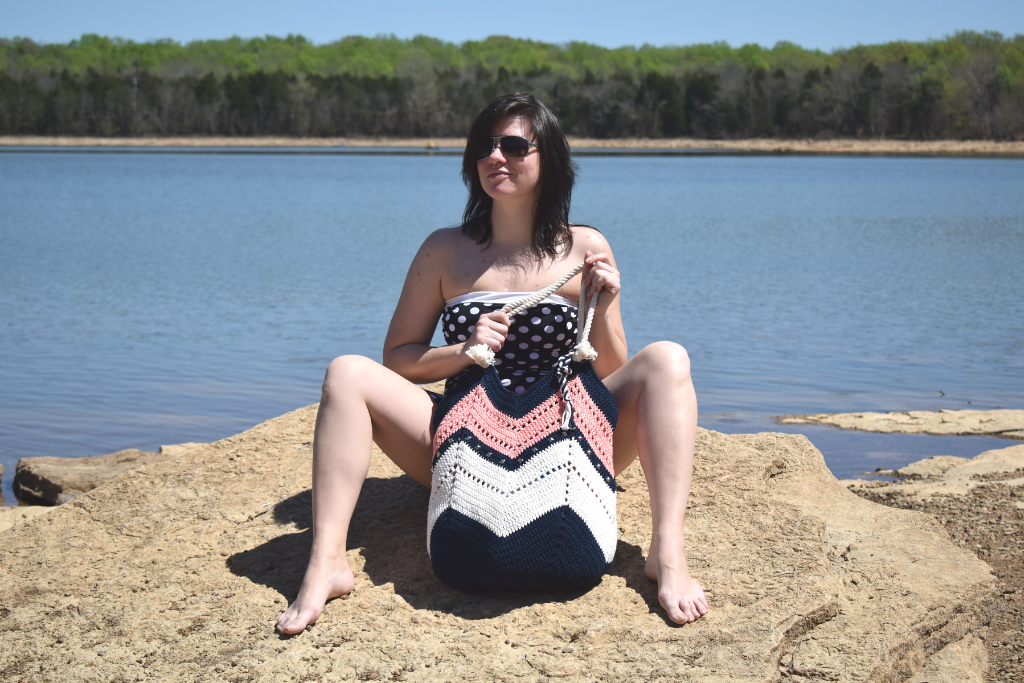
While I was working this granny square bag up I knew I wanted to add some sort of extra flair that wasn’t just yarn. I’ve seen free crochet bag patterns with twisted rope like this before and I just love the look of it. Added bonus: it won’t stretch! The inspiration for the name came from the fact that it’s made from a granny square (duh!) and the fun and modern spin I put on it. It seemed like the perfect name! I wanted a large bag to fit everything my family of 5 needs to take to the beach and this one certainly fits the bill. There’s room for all of our towels and all the necessities as well! Talk about roomy 😉
About the Yarn
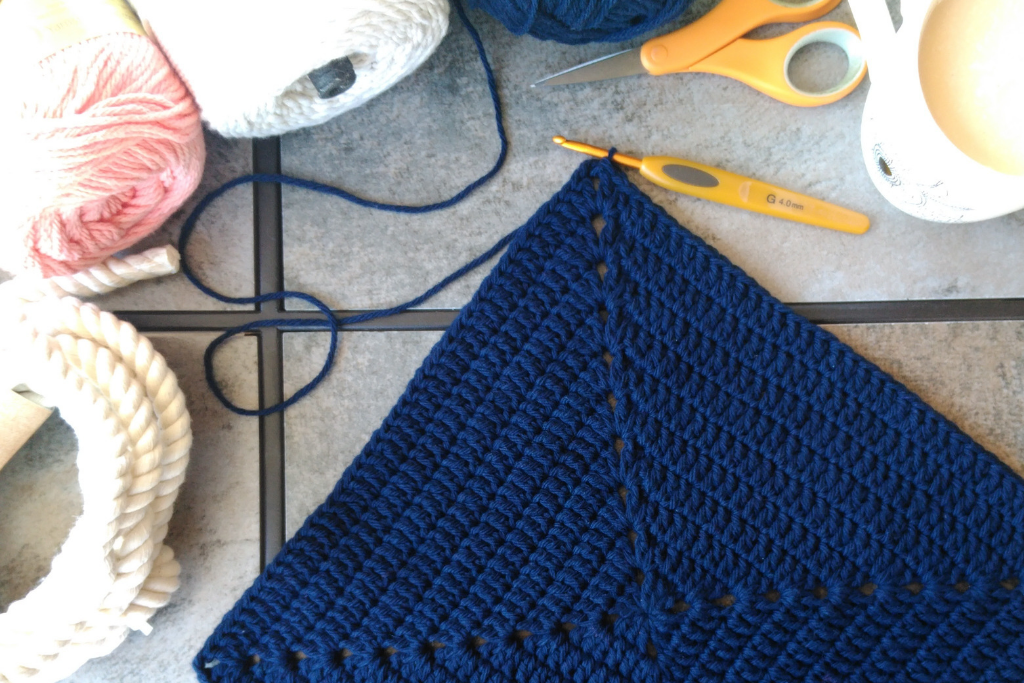
For my bag I used Lily Sugar N’ Cream which is a worsted weight cotton yarn. You can use any #4 cotton yarn for your bag. The best thing about cotton yarn for crochet bags is it holds up well and it’s also easy to wash.
The yarn weight does matter. Keep in mind the difference in gauge and the size your project will come out if you’re using DK or bulky weight yarn. Beach bags can get pretty big but you don’t want one TOO large!
Techniques Used
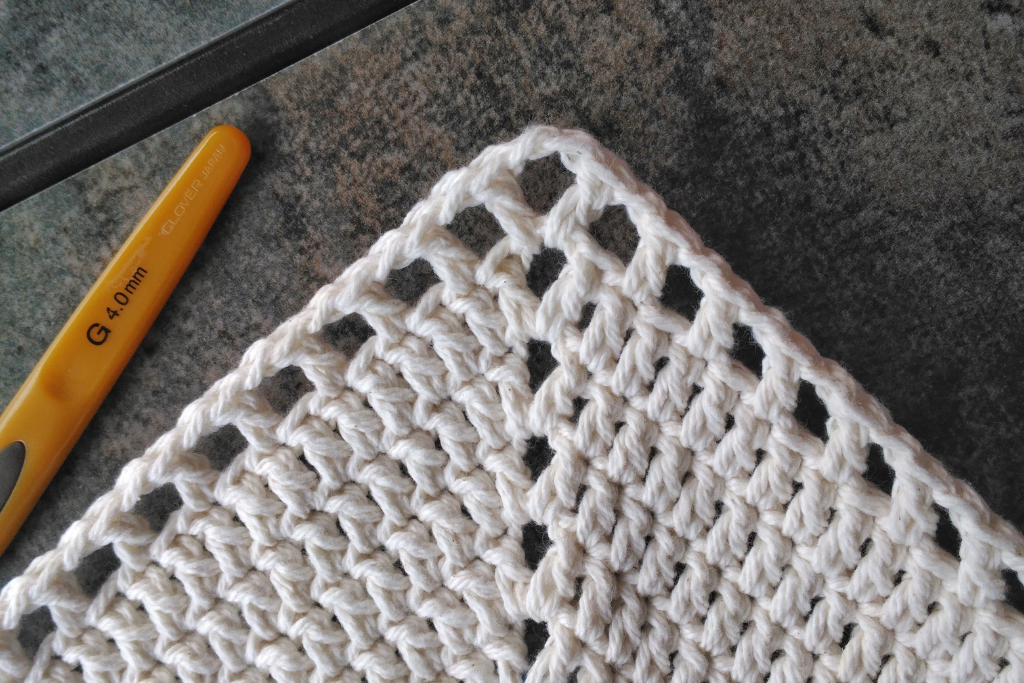
First, I want to talk about the gauge. I intentionally used a smaller hook than my yarn called for because I wanted a sturdy, ‘tight-knit’ bag that would hold up. The body of the bag is quite sturdy. Keep your stitches as tight as you can work them comfortably to achieve this. If you’re using a different yarn (I still suggest using a cotton worsted weight yarn and not acrylic yarn), I recommend using a hook size 1-2mm smaller than the yarn calls for. If you’re using a heavier or lighter yarn add or subtract rows to the base accordingly to get the size bag you want.
I had just enough leftover yarn to make that cute little twisted rope that hangs on the handles. I think it just makes the bag that much more extra. I used the tutorial from this video to make mine.
Which brings me to the last, but certainly not least, element. Just look at those beautiful studs! I had bought this pack of DIY studs at my local Jo-Ann some time ago and they’ve just been waiting patiently for the perfect project for them. I really think they added a perfectly fun and punkish finish. Click here to shop the exact ones I used to get the same look.
The rope handles and little matching handmade ropes are super cute but didn’t give it that funky fresh finishing touch I was looking for…
Skill Level
Easy
Gauge
15 sts and 8 rows of solid dc in the round is 4″ x 4″ (10x10cm)
Finished Measurements
Laid Flat:
18″ (46cm) wide
19″ (48cm) from top points to base, not including the handles
Materials
4 balls Lily Sugar N’ Cream (For my bag I used 2 Bright Navy, 1 Coral, and 1 Ecru)
OR
Approximately 475 yards total
US Size G/6/4mm crochet hook
2-32″ (81cm) pieces of cotton rope
32-10mm metal studs
Tapestry needle for weaving in ends
Scissors
Notes
– I’ve written the pattern the same as I made my bag in the photos with the color changes and window rows. You’re welcome to switch it up with where you place your color changes and windows!
– * * indicates a repeat
– (xx) at the end of a row/round indicates how many total stitches for that row/round
Stitch Index
R – row/round
inc – increase
dec – decrease
ch – chain
ch-sp – chain space
st(s) – stitch(es)
sk – skip
PM – place marker
sl st – slip stitch
sc – single crochet
sc2tog – single crochet 2 stitches together
dc – double crochet
dc2tog – double crochet 2 stitches together
Pattern
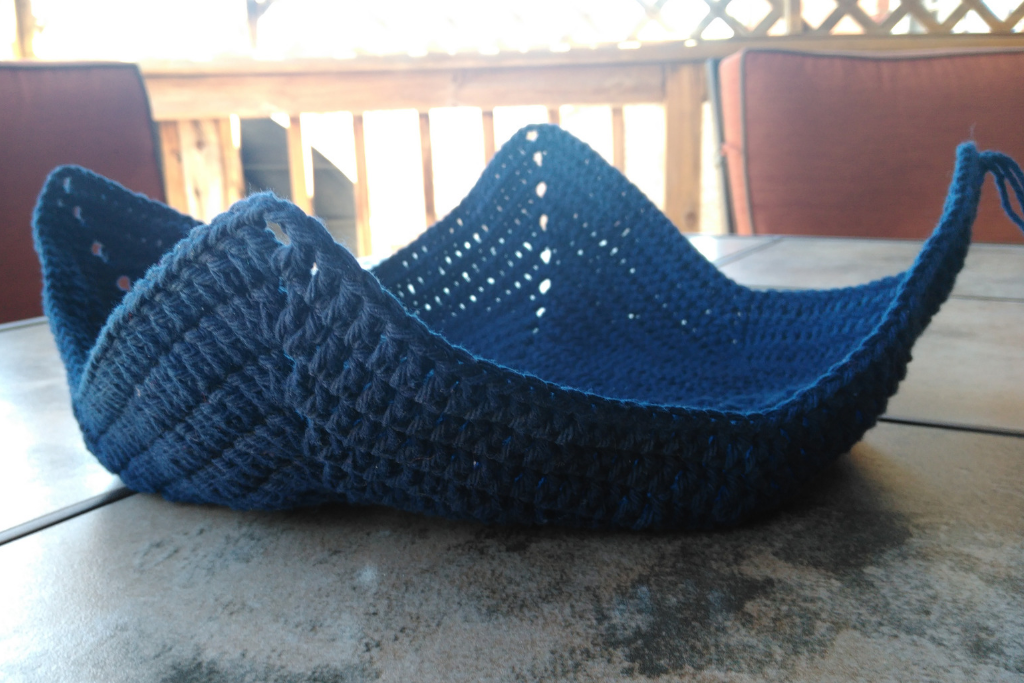
Building the base (how to crochet a solid Granny Square)
Foundation/R1 (in a magic ring) ch 1, sc, LOOSELY ch 1 (counts as 1 dc [I prefer this method as it fills the empty space better than a ch 2 or ch 3. Use whichever method you like]), dc 2, ch 2, *dc 3, ch 2* 3 times, sl st to the first dc, do not ch, do not turn, pull your magic loop tight
R2-10 sl st to the corner ch-sp, sc into/around the ch-sp, LOOSELY ch 1, [dc, ch 2, dc 2] all in the same ch-sp, dc in each dc to the next corner ch-sp, *[dc 2, ch 2, dc 2] all in the ch-sp, dc in each dc to the next ch-sp* repeat from * to * around, join with a sl st to the first dc, do not ch, do not turn
Note: This is the point that you will add or subtract rows based on how large or small you want your bag to be.
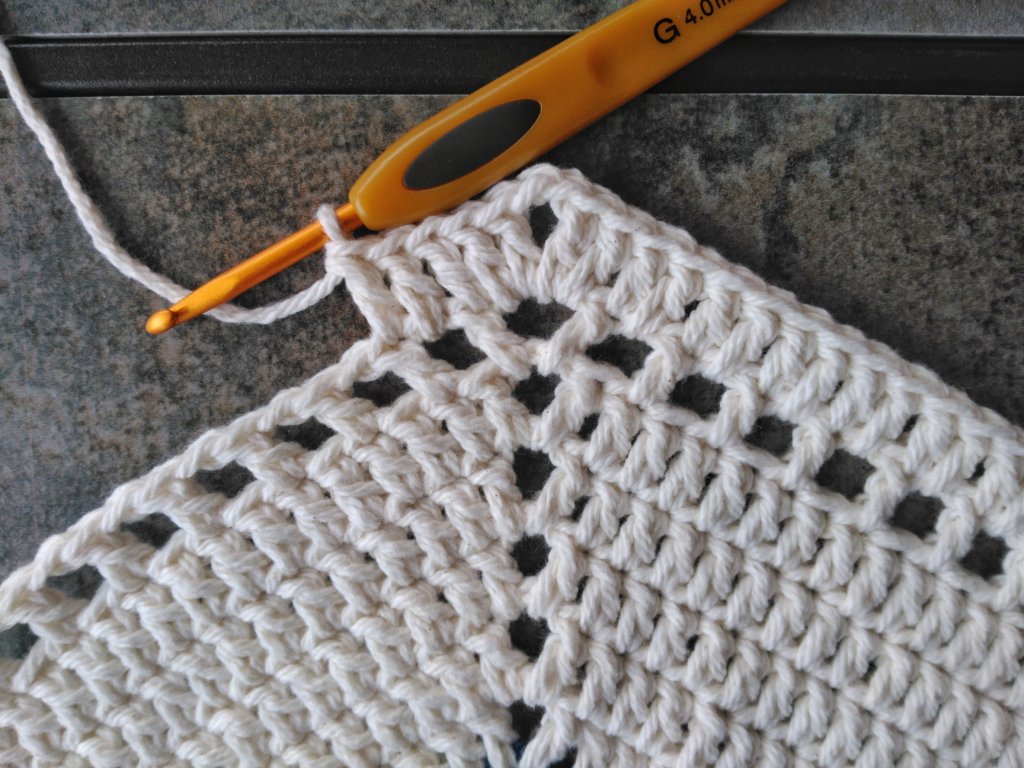
Place a stitch marker in the middle stitch of all 4 sides as shown in the photo below. You should have 19 sts on each side of each of your markers (from the stitch marker to the corner ch-sp).
We will start decreasing at the markers but will still be increasing at the corners for the next 2 rows. I like the way it builds the base. These next 2 rows are optional.
R11-12 sl st to the corner ch-sp, sc around the ch-sp, LOOSELY ch 1 (counts as 1 dc), [dc, ch 2,2 dc] all in the same ch-sp, dc in each dc until 1 st remains before your marker
dc2tog skipping 1 st in between the two posts of your decrease (dec by 2 sts)
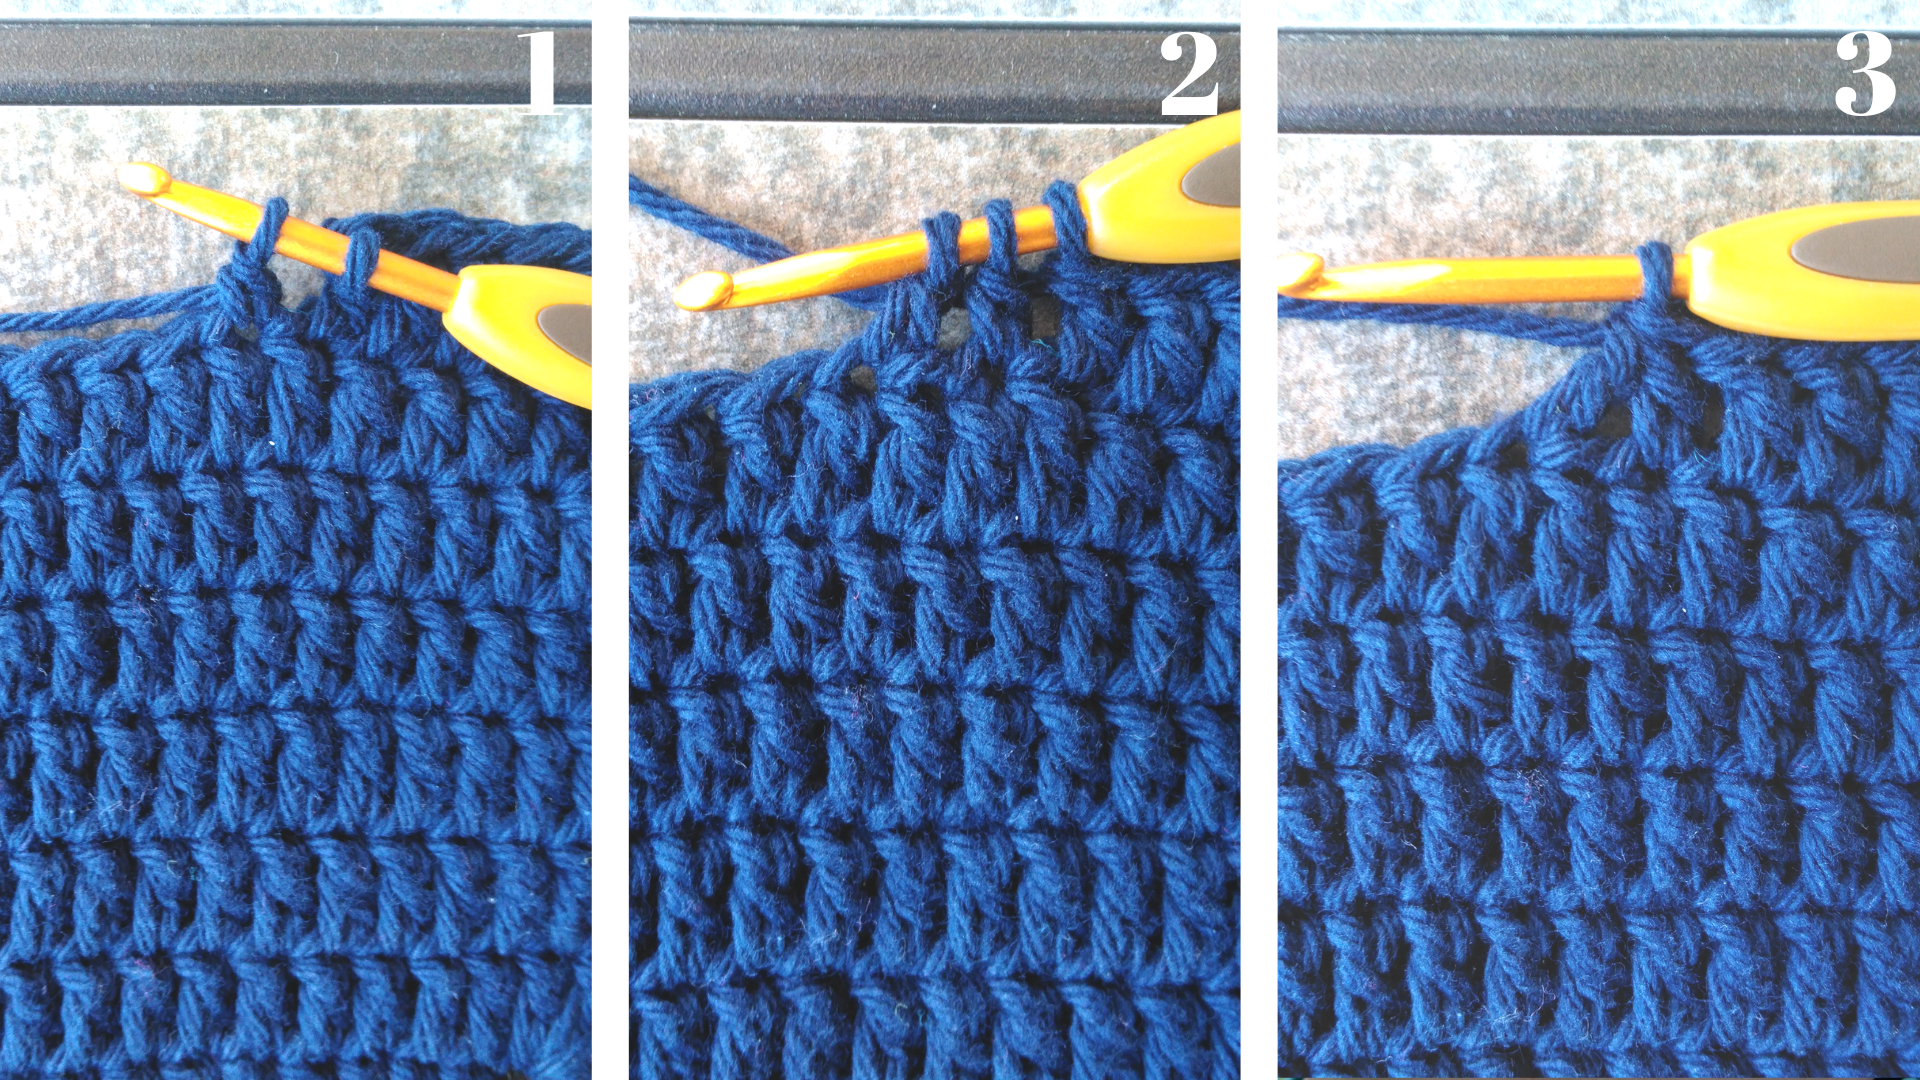
Replace your stitch marker in the dc2tog, *dc in each dc to the next ch-sp, [dc 2, ch 2, dc 2] all in the ch-sp, dc in each dc until 1 st remains before your marker, dc2tog skipping 1 st in between the two posts of your decrease (dec by 2 sts), PM in the dc2tog, dc in each dc to the next ch-sp*, join with a sl st to the first dc, do not ch, do not turn
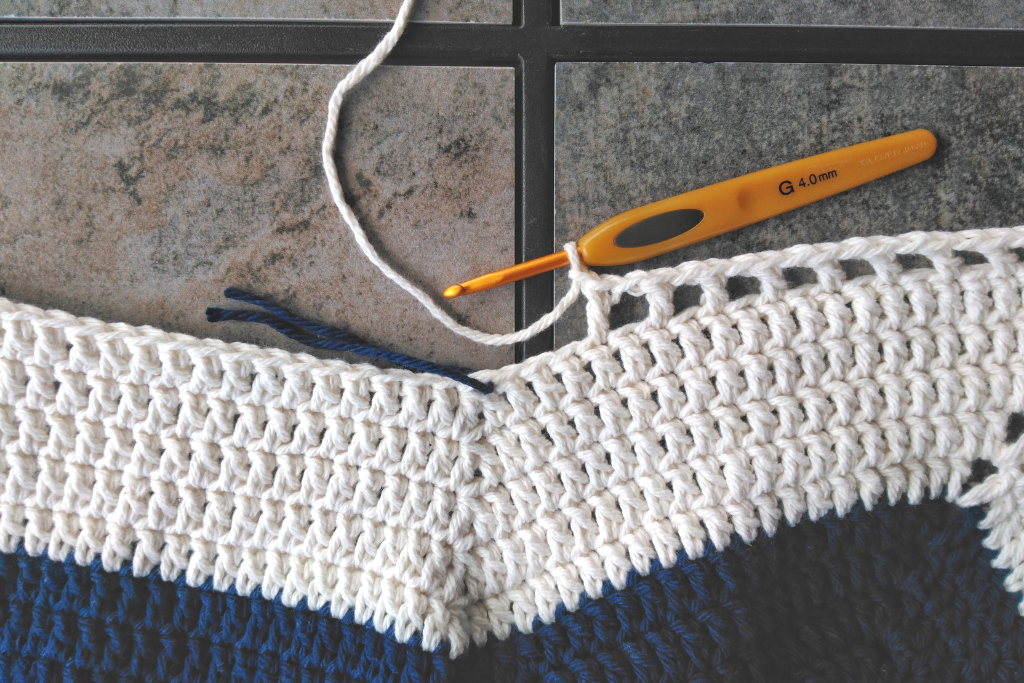
We will now keep the same number of stitches in each round to start building the body. Instead of writing out round for round, I’ve written out the instructions for the solid and window rounds (with photos!) and included the pattern I worked below.
Here’s what the bottom of the bag looks like after the completion of round 14 before I switched colors for the first time.
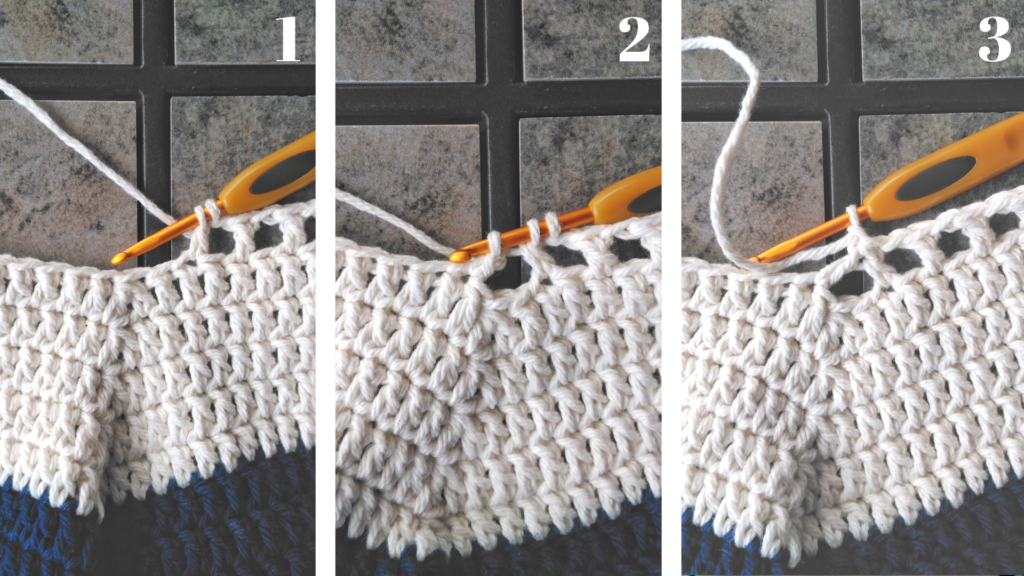
Solid Rounds
sl st to the corner ch-sp [sc around the same ch-sp, LOOSELY ch 1 (sc and ch 1 counts as 1 dc), ch 2, dc] in the same ch-sp, *dc in each dc until 1 st remains before your marker, dc2tog skipping 1 st in between the two posts of your decrease as seen in the tutorial above (dec by 2 sts), PM in the dc2tog, dc in each dc to the next ch-sp, [dc, ch 2, dc] in the ch-sp, join, do not ch, do not turn
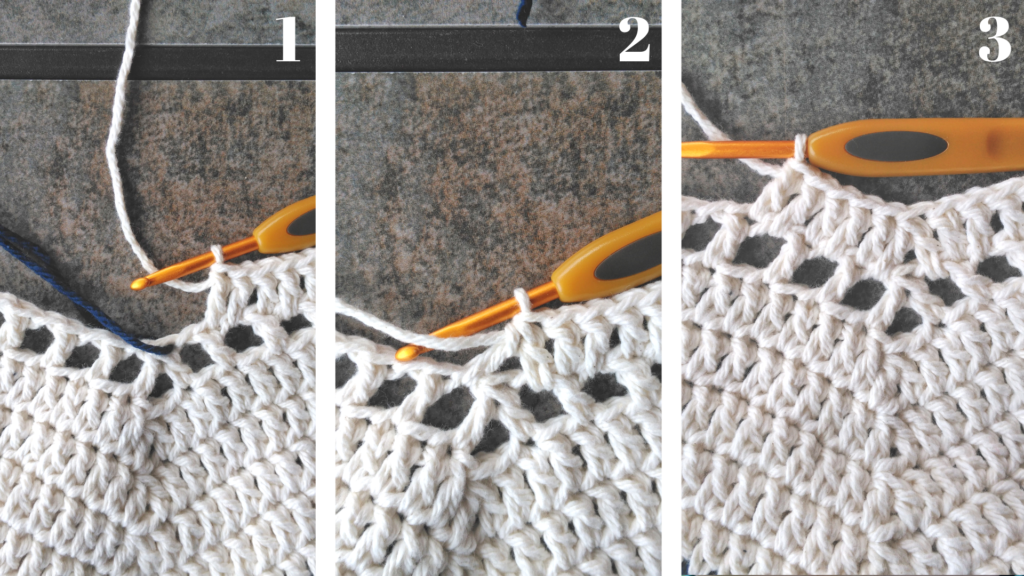
Window Rounds
sl st to the corner ch-sp (placing the last sl st into/around the ch-sp), ch 4 (counts as 1 dc and ch 2), dc in the same ch-sp, *ch 1, sk 1 dc, dc in the next dc*
repeat from * to * until 3 sts remain before the next marker
1) ch 1, sk 1 dc, start your dc2tog in the next dc (yo, insert hook and pull up a loop, yo, pull through 2 loops [2 loops on hook])
2) sk 3 ch, work the 2nd part of your dc2tog into the next ch (yo, insert hook and pull up a loop, yo, pull through 2 loops [3 loops on hook])
3) yo, pull through all 3 loops on your hook, replace your marker in the dc2tog
*ch 1, sk 1 dc, dc in the next dc* until 1 st remains before the next corner ch-sp, [dc, ch 2, dc] all in the corner ch-sp

Solid Round AFTER a Window Round
Note: I do my window rounds slightly different than most and they decrease in total stitches for the round. The solid round directly after a window round is slightly different from the other solid rounds to get back to the correct number of stitches.
sl st to the corner ch-sp, sc into/around the ch-sp, LOOSELY ch 1 (counts as 1 dc), [dc, ch 2, dc 2] all in the same ch-sp
1) dc in each dc and ch-sp until 1 ch-sp remains before your marker
2) dc2tog skipping the marked st from the previous round in between your 2 decrease posts
3) dc in each dc and ch-sp to the next corner
[2 dc, ch 2, 2 dc] all in the corner ch-sp, repeat from Step 1 around, join with a sl st to the 2nd ch of the beg ch 4
After you complete this round, return to working the instructions for the solid rounds as seen before.
Color scheme and solid/window pattern I worked my bag in
R15-19 Ecru – Solid
R20 Ecru – Window
R21 Ecru – Solid (inc)
R22-23 Bright Navy – Solid
R24 Coral – Solid
R25 Coral – Window
R26 Coral – Solid (inc)
R27 Coral – Solid
R28 Coral – Window
R29 Coral – Solid (inc)
R30-32 Bright Navy – Solid
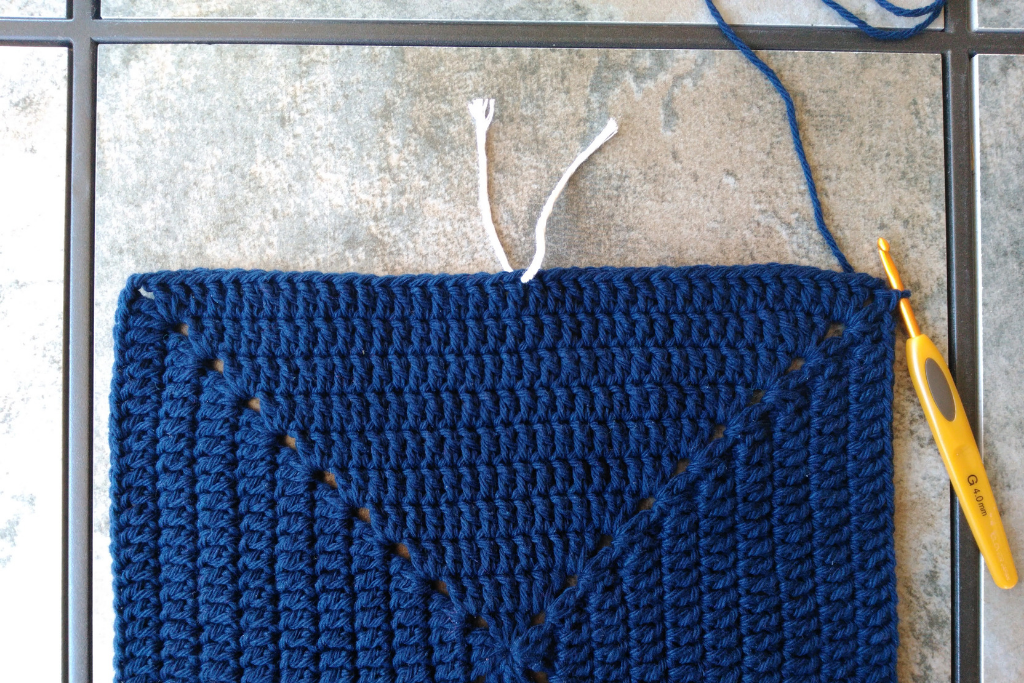
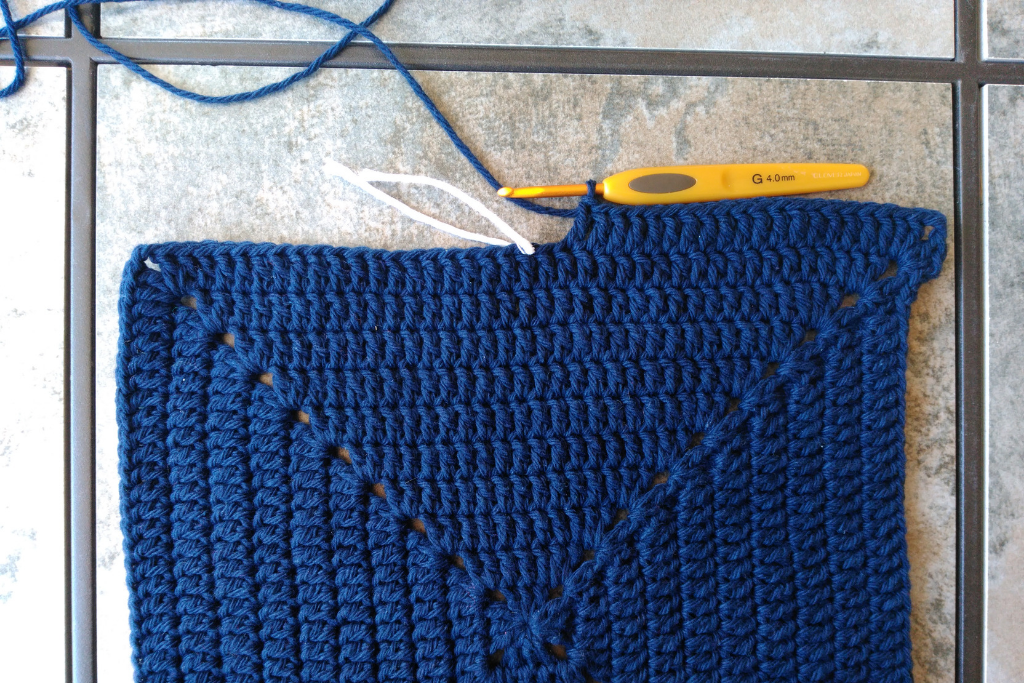
Note: Please do not skip the last round of single crochet stitches! It is there to give more stability to the ch-sps for when you attach the rope handles.
R33 ch 1, sc in the same joining st and each st across placing 3 sc in each ch-sp and a sc2tog (skipping one stitch in between as with the dc2tog in the pattern) at each stitch marker, join, break yarn.
Finishing Touches
Attach your two ropes to the corner chain spaces at the top with a knot (insert from the inside and knot). I frayed the ends a little with my fingers for a slight boho appeal. It doesn’t matter which spaces you attach them to as your granny square bag is completely symmetrical.
You can find the video tutorial for the cute little handmade ropes that dangle festively HERE. I used 2 bits of scrap yarn about 30″ (76cm) long for each of them and attached one to each handle.
For the studs I placed 8 of them evenly on each side of the bag. I did one side at a time, lying my bag flat and moving them around a bit until I was satisfied with where they were before I fastened them. There are two prongs on the back of each stud that you simply push through the fabric and push closed in on themselves on the backside. Be sure to push them in as far as you can to prevent snagging on fabrics or skin!
Finish off and weave in ends!
Final Thoughts on the Margot Market Bag
I hope you love this crochet market tote bag pattern! Making your own bag for shopping at the farmer’s market or grocery store is a great way to reduce the use of plastic bags.
Speaking of plastic bags, do you know what plarn is? It’s plastic yarn made from cutting plastic bags from the grocery store.
To read more about plarn and how to make it, check out How To Make Plarn (Plastic Yarn) And Crochet With It. I even made a version of the free crochet bag pattern here with plarn and I absolutely love how it came out! It was the perfect size to hold a LOT of produce at the farmers market but was still easy enough to carry.
You can use plarn to make all types of reusable bags and other crochet projects too. Get creative with what you make.
If you’re looking for some plarn crochet project inspiration, check out Free Plarn (Plastic Yarn) Crochet Pattern Roundup.
Sharing is caring and a great way to support small businesses like mine at no additional cost! Bookmark this blog post or pin it to your favorite Pinterest board for later and to share with your friends.
Happy crocheting!
PLEASE READ: THIS PATTERN AND ITS CONTENTS ARE THE SOLE PROPERTY OF YARNIQUE (CHANTAL CAMPSEY) AND MAY NOT BE ALTERED, SOLD, OR REDISTRIBUTED IN ANY WAY WITHOUT PERMISSION FROM ITS AUTHOR. YOU MAY, HOWEVER, SELL AS MANY FINISHED PROJECTS AS YOU DESIRE, I JUST ASK THAT YOU REFERENCE MY BLOG AND/OR SHOPS FOR CREDIT FOR THE PATTERN.
Final Thoughts on Not Your Granny’s Beach Bag
One of the first things I ever crocheted was traditional granny squares. I love how simple they are to make. No special stitches required! And yet they’re so versatile. You can make so many things with a classic granny!
This easy crochet pattern is a great way to incorporate granny squares into fresh crochet projects. I made mine as a beach bag, but you can certainly use this as a market bag or an everyday bag as well. Adding a fabric lining would be fun too.
Not Your Granny’s Beach Bag has been my most popular crochet project to date and for good reason, I think. I hope you love making yours as much as I did mine.
Happy crocheting!