Fast Track Puff Mat (Free Easy Crochet Rug Pattern)

Crochet this quick and easy crochet rug pattern in neutral or vibrant colors to spruce up your living room or any other space. A beautiful rug is an easy way to add a pop of color or tone down a color palette in any room.
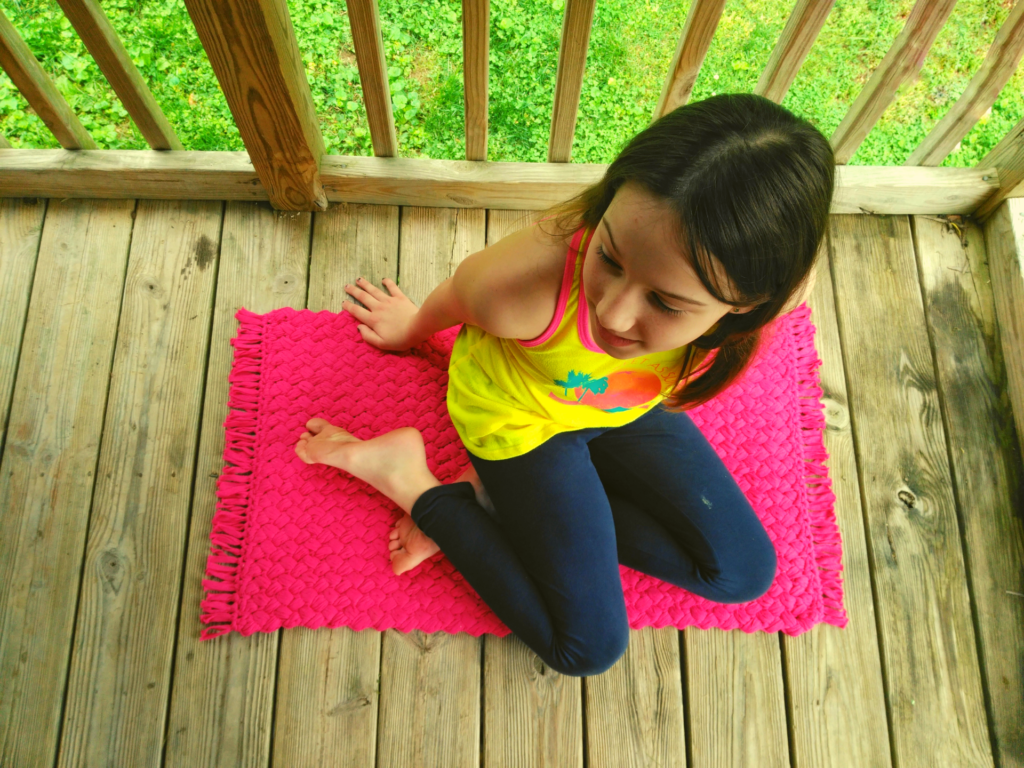
My daughter loves this handmade rug and it was such an easy crochet project that makes a great addition to her bedroom. It was the perfect way to use up this chunky yarn with a t-shirt yarn like quality.
If you want to make yours in a different size, this pattern is super customizable. In the stitch pattern tutorial below, your starting chain multiple is provided so you can make your own crochet rug in any size.
This page contains affiliate links which means if you purchase through any of them I receive a small commission at no extra cost to you. Thank you for supporting my small business! Find my full disclosure policy here.
About The Yarn
This is the first time I’ve used t-shirt yarn for a project, and I love the result. The flat, tubular shape of the yarn gives it such unique stitch definition.
With the stitch used in this project I went up 2mm in hook size than the yarn called for, from the recommended 8mm crochet hook size to a 10mm hook. The particular yarn I used for my project is now discontinued so here are a few other yarn recommendations:
- Bernat Maker Home Dec – This is a truly lovely yarn. It’s more tubular than tape like but the stitch definition is out of this world with this one. It comes in an array of beautiful solid and variegated colorways. It’s also outdoor friendly making it a great option for a cute crochet rug for outside your front door.
- Lion Brand Yarn Homespun Thick & Quick – I would love to see this rug in Homespun! A lot of makers don’t enjoy using Homespun because it can be difficult to see your stitches if you’re not used to using this type of yarn. At the same time, though, it can be very forgiving. It would make an amazingly soft and squishy rug!! Tip: you can substitute Homespun Thick & Quick for double strands of regular Homespun to get the same gauge.
- Lion Brand Yarn Wool Ease Thick & Quick – This blended acrylic and wool yarn is an awesome option for crocheted rugs. Not only will it be soft like acrylic, but it will be a little sturdier because of the wool.
- Any other kind of super bulky t-shirt yarn – Really any type of super bulky t-shirt yarn will do for this fun rug.
- Make your own t-shirt yarn! – Making your own yarn out of old t-shirts or old sheets is a good idea if you have lots of old ones lying around. And it would be scrap yarn as I’m sure they’re not all the same color, making it even more interesting.
Techniques Used
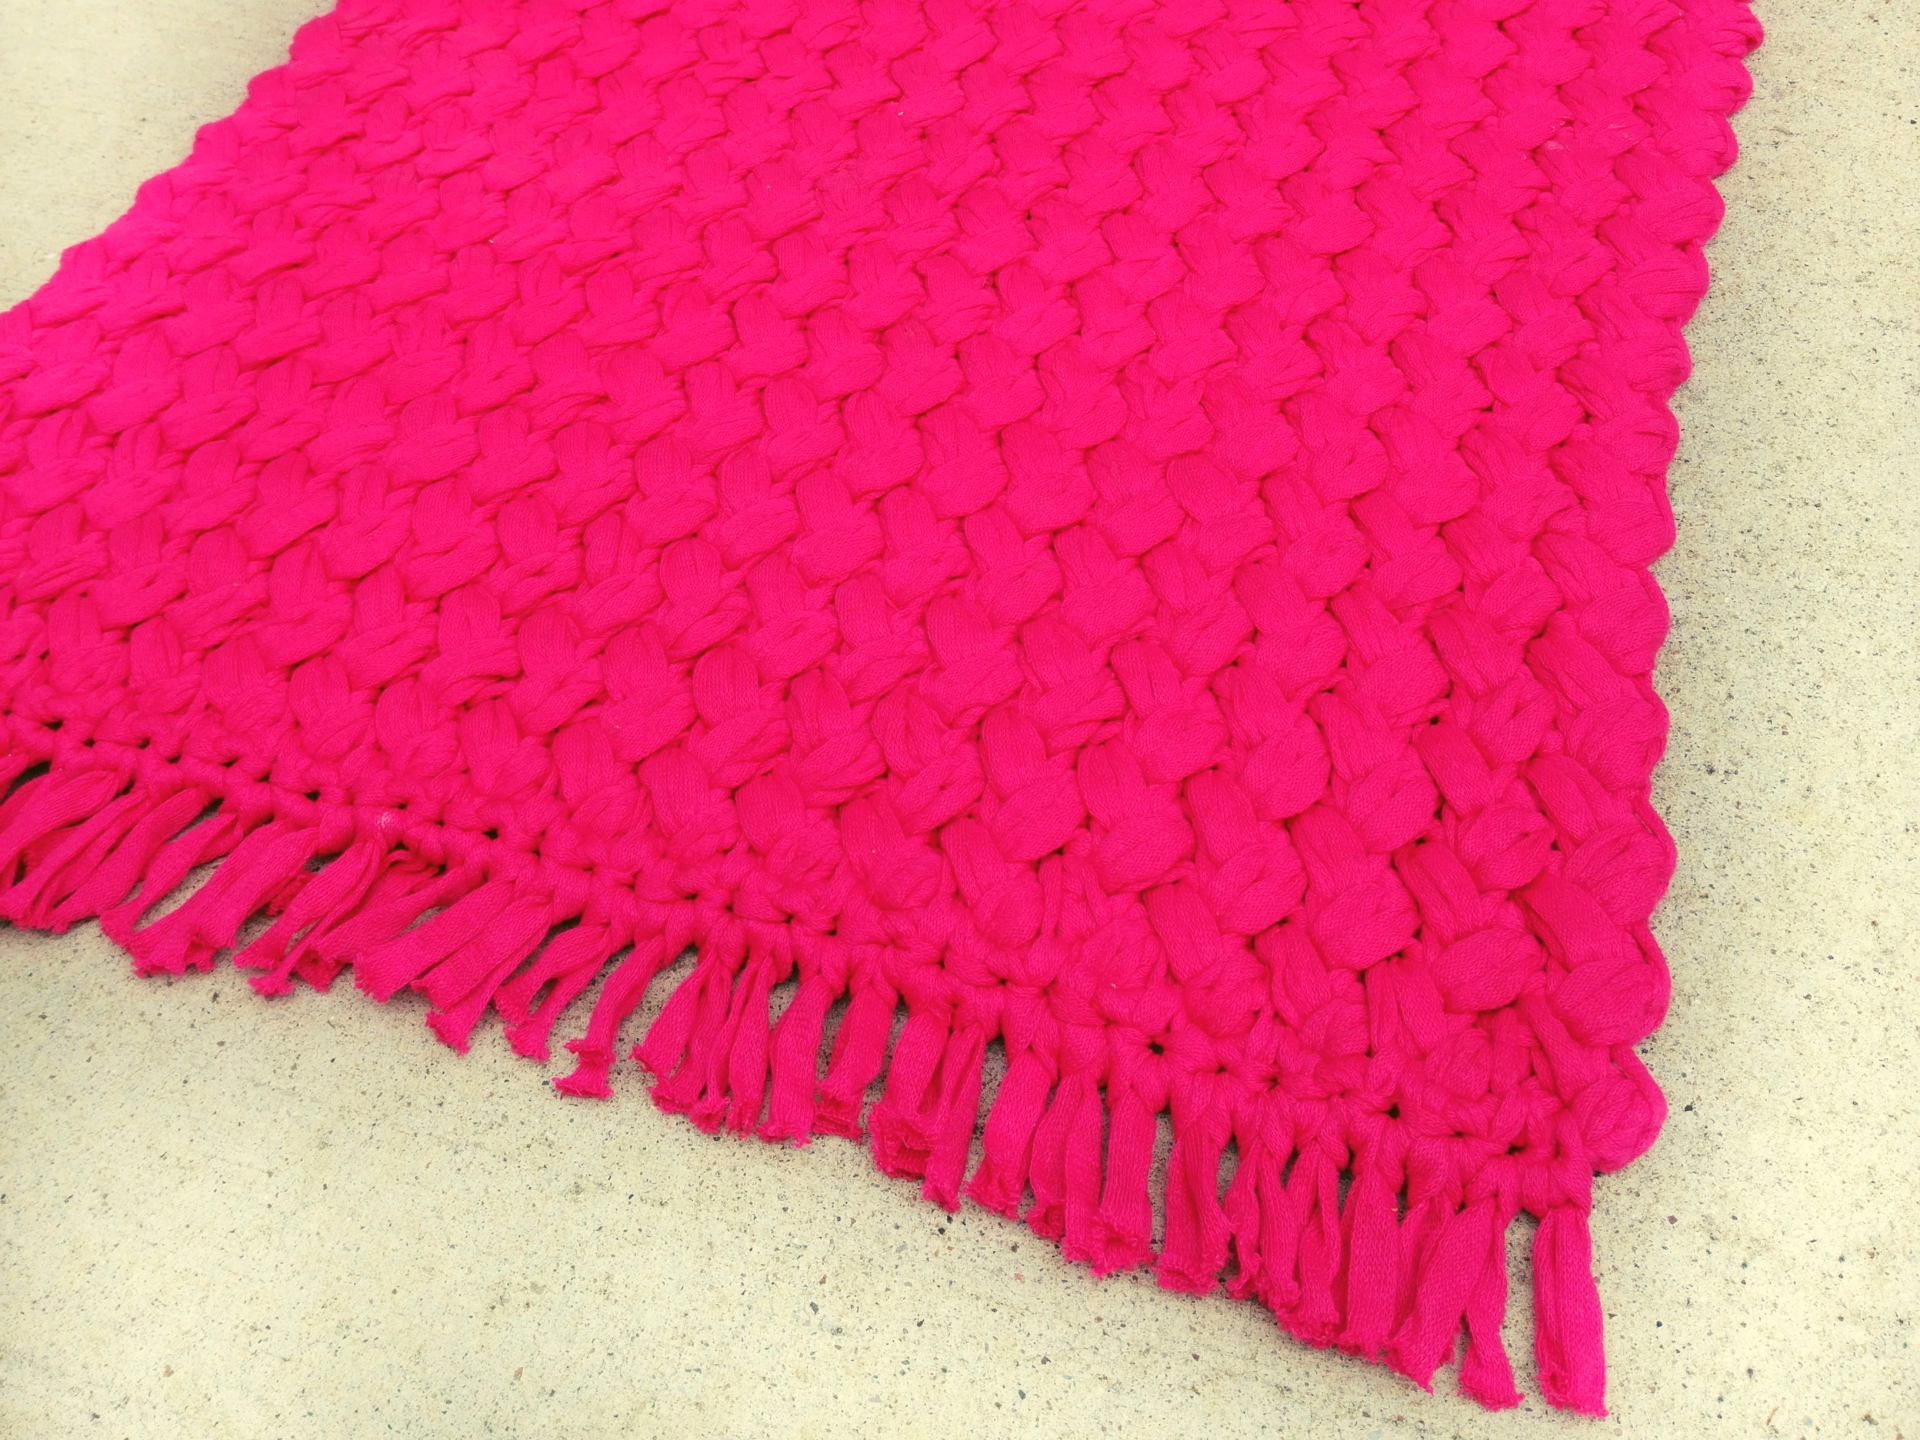
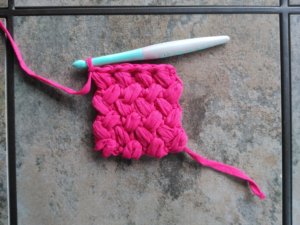
This easy crochet rug pattern uses the bean stitch. The bean stitch is rows of puff stitches crocheted into the side of the previous row’s puff stitches to create the diagonal look.
I absolutely love the thickness of this stitch. It’s perfect for crocheting rugs in my opinion.
The only stitches used in this pattern are puff stitches, chain stitches, and single crochet stitches. Below is a photo tutorial of the bean stitch if you’re not familiar, so even beginner crocheters can tackle this one!
Inspiration
When I was gifted this fabric yarn from a friend, it sat in my yarn stash for a long time before I got around to using it. I knew it would be perfect for something, I just didn’t know what! As soon as I remembered using this beautiful stitch, I knew it would make a super comfy and stylish rug!
I think that t-shirt yarn is the best yarn for this project. However, it would also be amazing in a cotton yarn or acrylic yarn that’s not too soft. Use double or triple strands of worsted weight yarn to create a thicker fabric for your own rug.
Skill Level
Beginner
Gauge
4 sts and 6.25 rows in pattern is 4″ x 4″ (10x10cm)
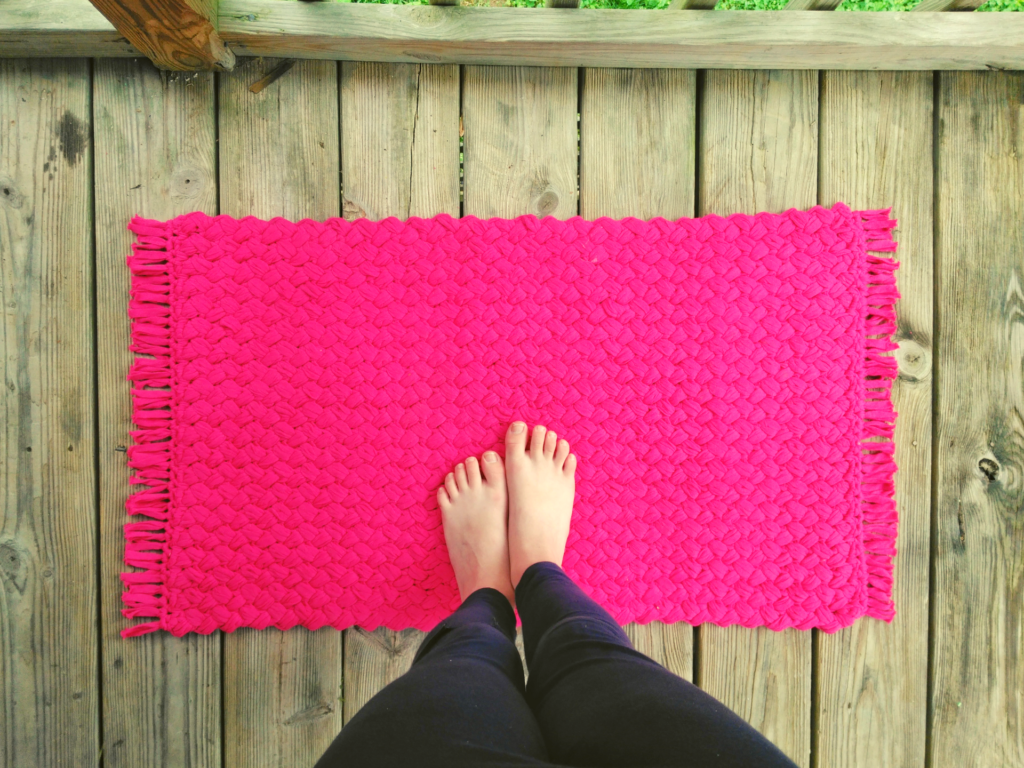
Finished Measurements
20″ (50cm) x 32″ (81cm), before adding the fringe
Materials
5 balls Lion Brand Fast-Track (This yarn is discontinued. See above for other yarn recommendations.)
OR
Approximately 675 yards any super bulky t-shirt yarn or equivalent
US Size N/13/10mm crochet hook (Clover Amour hooks are amazing!)
Tapestry needle for weaving in ends (Try these for larger yarn like this!)
Scissors (I love these!)
Stitch Index
R – row/round
ch – chain
ch-sp – chain space
st(s) – stitch(es)
sk – skip
sl st – slip stitch
sc – single crochet
ps – puff stitch (*yo, insert hook and pull up a loop* 3 times, yo and pull through all 7 loops on hook)
Bean Stitch Tutorial
This project starts with a ch 41. I’ve used a swatch 4 puff stitches wide for photos. The beginning chain should be multiples of 2 +1.
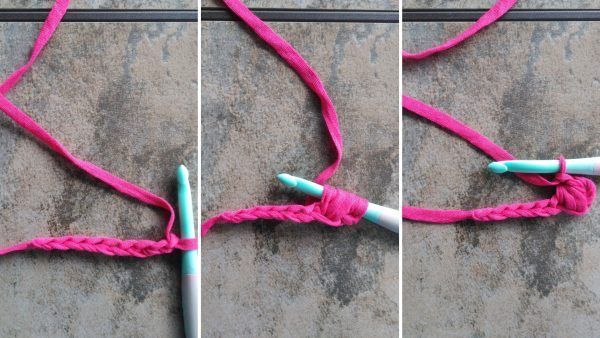
1 ch multiples of 2 + 1
2 *yo, insert hook and pull up a loop* 3 times in the 3rd ch from your hook
3 yo, pull through all loops, ch 1
4 *sk 1 ch, ps in next ch, ch 1* across
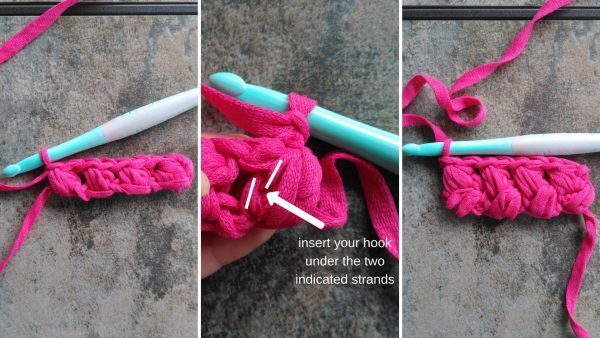
5 ch 1, turn, ps into the side of the last ps from the previous row (the photo above shows the two strands you should work your ps into)
6 *ch 1, ps into the side of the next ps* across, ch 2, turn
Repeat the last row until you reach your desired length.
Get an affordable, easy to read PDF on Ravelry, Etsy, or LoveCrafts!
Pattern
Foundation ch 41
R1 ps in the 3rd ch from your hook, *ch 1, sk 1 ch, ps in the next ch* repeat from * to * across, ch 2, turn
R2 ps into the side of the last ps from the previous row, *ch 1, ps into the side of the next ps*, repeat from * to * across, ch 2, turn
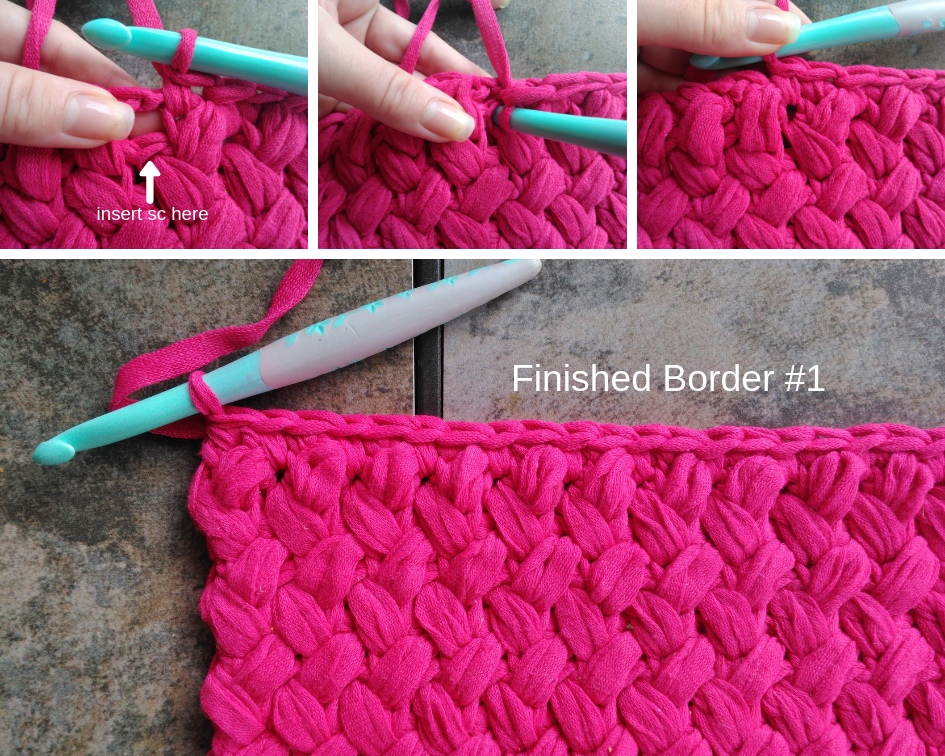
R3-51 repeat R2, after R51, ch 1 and turn for the edging row
R52 sc into the side of the last ps from the previous row, *sc into the top of the ps from two rows previous as seen in the top left photo below, sc into the side of the next ps* repeat from * to * across, break yarn (39)
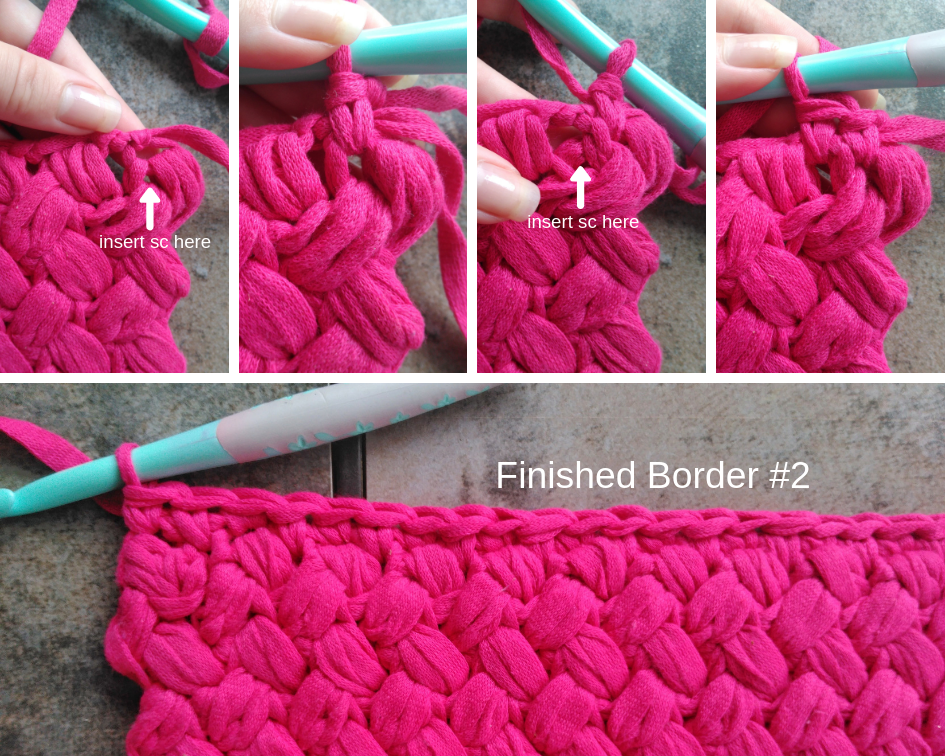
R53 with the right side facing up (the only difference now is the side you worked the other edging row on) attach a new strand of yarn with a sc in the ch of the very first ps made as seen in the top left photo below, *sc into the back couple strands of the ps from 2 rows below as seen in the top 2 right photos below, sc in the ch of the next ps* repeat from * to * across, break yarn (39)
Fringe
Cut 78 6″ strands of yarn and attach one strand in each stitch on both of the short ends. Weave in your ends and you’ve got yourself a cute and functional new rug!

Looking for more free crochet patterns?
Click here to see all of my crochet patterns organized by type of project!
Final Thoughts on the Fast Track Puff Mat
I hope you enjoy making this easy crochet rug pattern. What yarn will you make yours in? Let me know in the comments below!
Sharing is caring and a great way to support small businesses like mine at no additional cost! Bookmark this blog post or pin it to your favorite Pinterest board for later and to share with your friends.
Happy crocheting!
PLEASE READ: THIS PATTERN AND ITS CONTENTS ARE THE SOLE PROPERTY OF YARNIQUE (CHANTAL CAMPSEY) AND MAY NOT BE ALTERED, SOLD, OR REDISTRIBUTED IN ANY WAY WITHOUT PERMISSION FROM ITS AUTHOR. YOU MAY, HOWEVER, SELL AS MANY FINISHED PROJECTS AS YOU DESIRE, I JUST ASK THAT YOU REFERENCE MY BLOG AND/OR SHOPS FOR CREDIT FOR THE PATTERN.
Bloggers: I would love for you to feature my work in a roundup! You may use one photo and link directly to my blog for the free pattern. Send me an email at yarniqueblog@gmail.com with a link to your post so I can share it with my followers.